Git rid of your XAML builds – Migrate now

Have you recently migrated from TFS to Visual Studio Team Services?
Are you happy with that decision but the existing XAML based build definitions sucks? Then this article might help, as it explains the structure of the agent based build system, which is very powerful especially for companies with cross platform projects.

The Architecture

In the former days the XAML based build system used a dedicated build controller which was able to trigger a build via push. This meant that the build agent needed to be available from the build controller. Hosting build agents in the cloud or better build agents dynamically, was always a pain.

With the new step-based build system of Visual Studio Team Services, Microsoft simplified the architecture and removed the build controller out of the game. The only component which is required is a simple agent that needs to be installed. Based to Web-Sockets this agent does not need to be available from outside because the agent dials into the VSTS services and offers triggering build runs. This makes adding and removing build agents dynamically a breeze. Just prepare your AMI, VHD or other image and spin off new virtual machines if needed.

The Step System

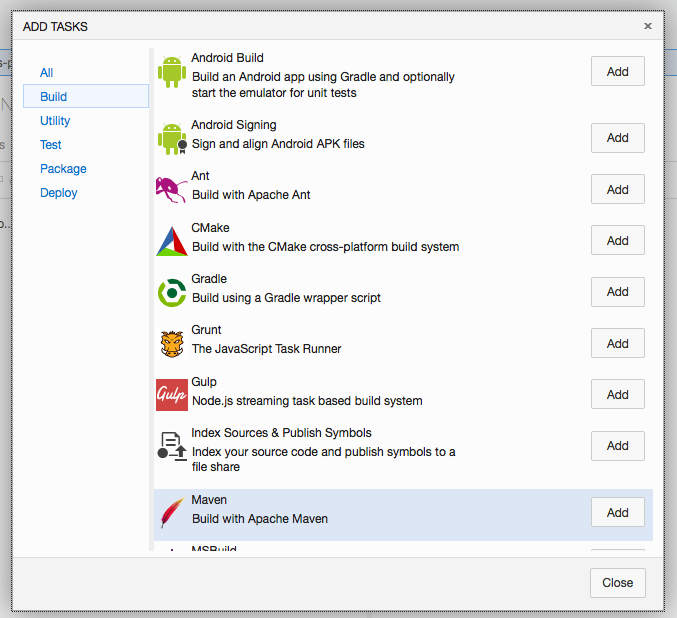
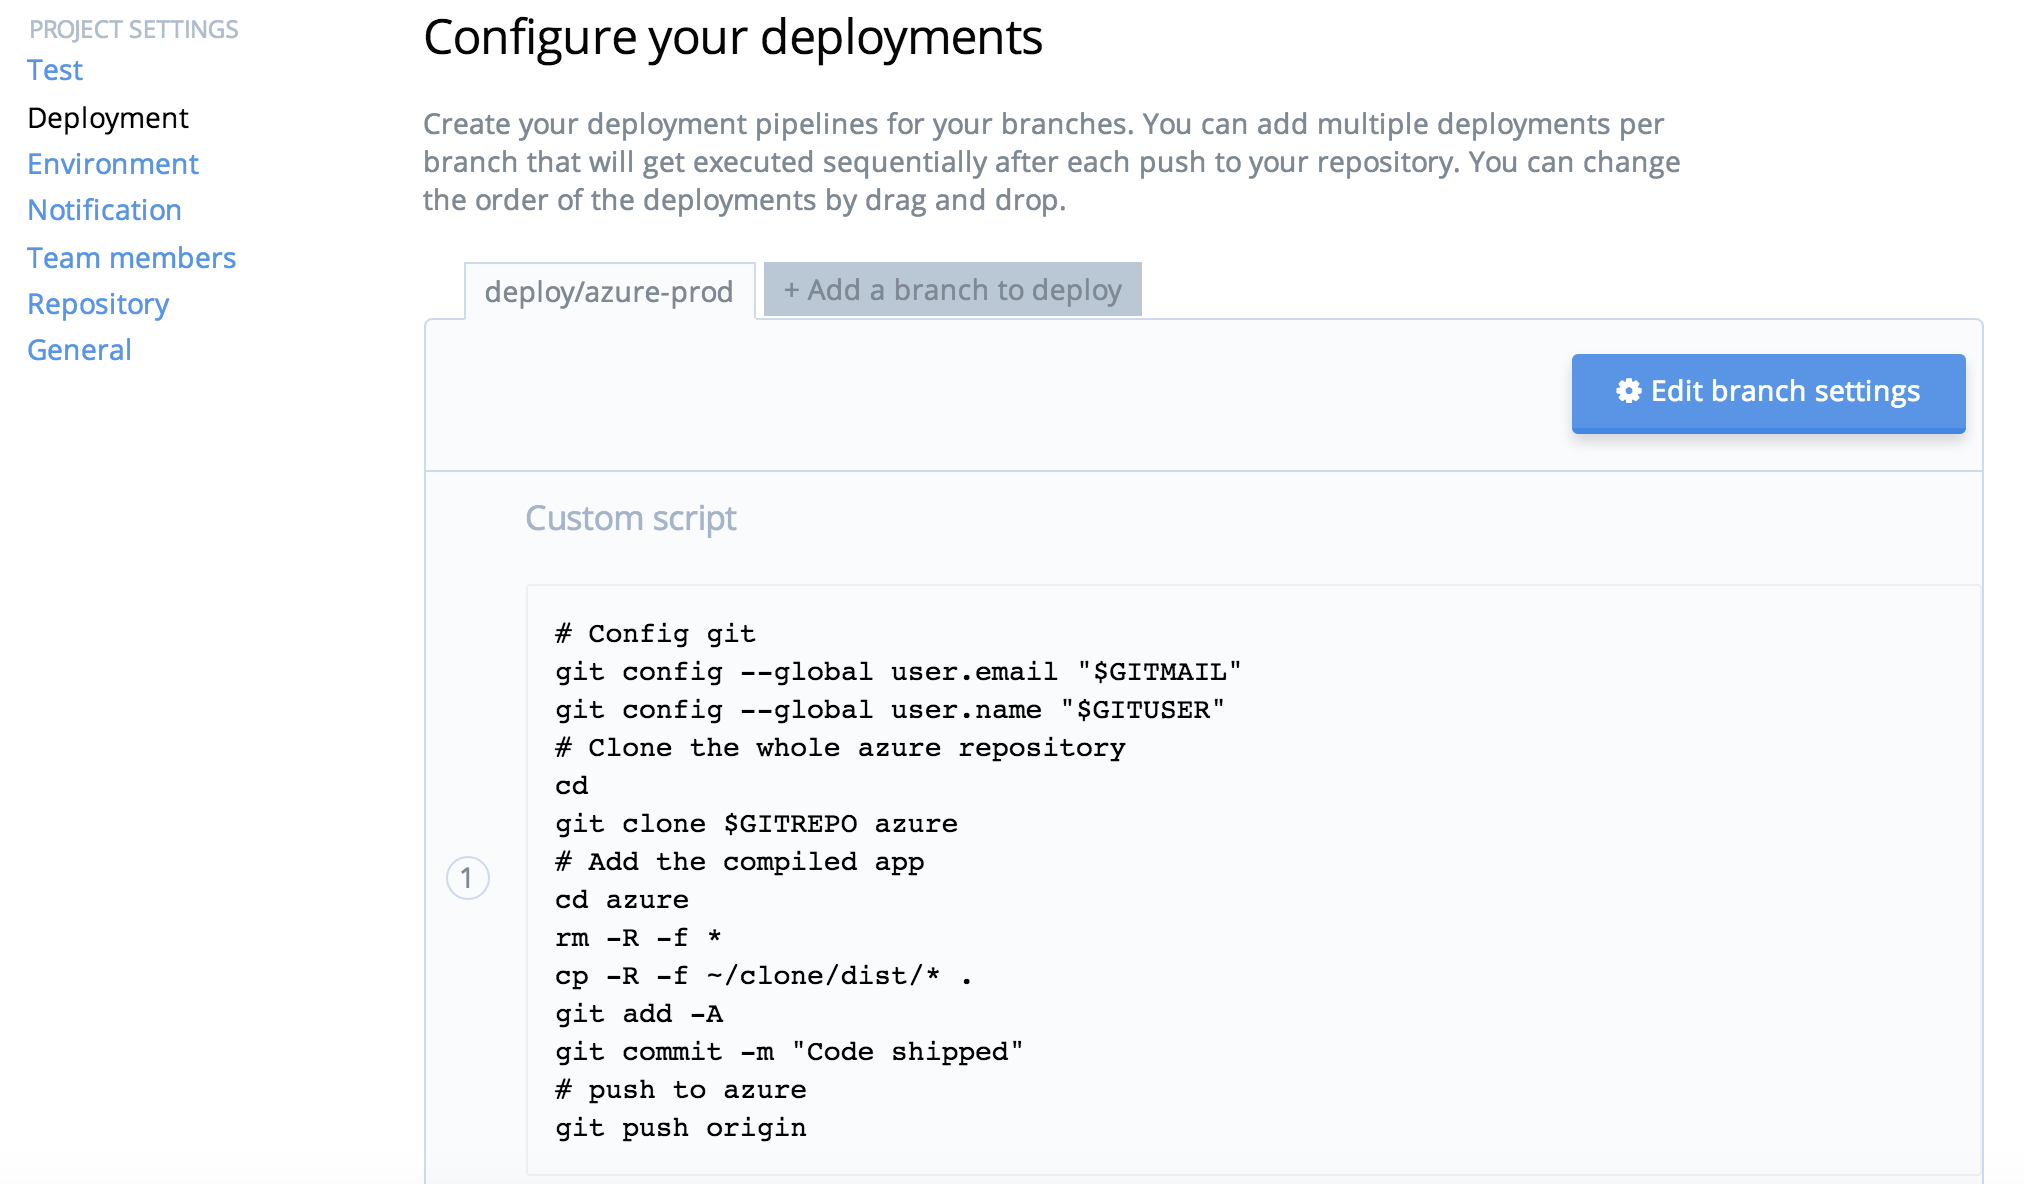
The described new architecture also delivers a brand-new step-based build system. Editing complex XML based workflows in Visual Studio is not required any more. The author of a build-process can pick and choose pre-defined activities to execute a very specific build-step, e.g. compile source code, generate a web deploy package or sign files.

vso-build-def.png

At the end every build step is nothing more then a command line tool, that is executed in the context of the current build. Because of that, also the Command-Line-Activity is one of the most important actions in the step-based build system when it comes to more complex workflows.

vso-build-tasks.png

Cross-Product-Groups/Departments will love the possibility to create new custom activities, which can be used from other teams and groups within the company. This makes complex build tasks really easy to use for other teams. There is an important idea behind the new build system: “Let developers create the build, get rid of your dedicated build team.” In an Agile world we are talking so much about cross functional teams, that build management should become part of it.

Advanced features you should know about

Microsoft also delivers a couple of features in the new step-based build system to target more complex scenarios.

Multiple Build Agents on the same machine

There are no reasons for using just a single machine per registered build agent. If you would like to get the most out of your existing infrastructure, just install the Microsoft build agent multiple times on your build servers.

Tip: We are using 3 build agents on the same virtual machine which gives us a good utilisation regarding CPU and RAM. On Linux we switched to machines backed via SSD because of I/O intensive docker and Java builds

Release Processes vs. Build Processes

The new release process feature in VSTS is a great option to differentiate between building a pice of software and delivering a piece of software. Especially when the vendor works with a test chain it’s possible to move SaaS software through different states. Especially codeship becomes popular with this kind of feature set.

Push to HockeyApp

Microsoft acquired HockeyApp, a leading vendor in crash dump collection and beta app deployments for Android, iOS and Windows.

hockeyapp-integration.png

Related to this acquisition the Visual Studio Team Services team offers a seamless integration, which allows to upload your build directly to HockeyApp. This works on all required platforms, also on XCode builds for iOS or OS X. At Microsoft Build 2016 the HockeyApp team announces that Xamarin Insights becomes part of HockeyApp. Related to this check our the technical presentation of the HockeyApp team here.

Summary

With the new step-based build system Microsoft introduced in Visual Studio Team Services, a more flexible and simple-to-use option. Especially when you start with new projects, just use the step-based build system and do not invest in the old XAML builds. Software vendors who are writing software for different platforms can now use VSTS as a cloud based management tool, which means to get the most out of your MSDN benefits. Also when you are owning XAML based builds, invest in the migration. Microsoft recently announced that the XAML builds will be discontinued after 2016, so it’s time act.

Review: GitHub vs. Visual Studio Team Services (VSTS) – Should you switch?

Disclaimer: This article is about Visual Studio Team Services (VSTS) and GitHub. The author has a very positive opinion about both services and does not get any offers from Microsoft or GitHub writing this article. The whole article is written IMHO.

Over the last years GitHub has become a success factor for projects related to git repositories for me personally. I also tested several other solutions but mainly I struggeled with the performance or the usability. About 2 years ago I started using Visual Studio Team Services (VSTS) with a work related project. The service looked promising but had a lot of early release issues, so in the last 24 months it was interesting to see how a promising solution became adult. Last week I decided to move away from GitHub for all my closed source projects and rely on Visual Studio Team Service (VSTS). This article gives a deeper look on the main reasons of why I did the move and may help deciders to get detailed information before implementing:

Git-Repository sprawl
Nowadays thanks to bower, npm, bundler or NuGet the amount of Git repositories are growing steadily. When you are focused on component based software development Git is a great helper but the amount of repositories is sprawling because very often every component has its own live in a separated Git repository, which means you have a separate release cycle and a different versioning compared to your main project.

vsts-git

I guess this is the secret source of component managers which are working closely together with git repositories. Of course VSTS and GitHub are supporting multiple git repositories but GitHub lets you pay on a package on git repositories, VSTS lets you pay for users. Especially for small teams paying for users is the better deal, compared to paying for repositories. At the end Microsoft offers a smaller groups of 5 everything for free. This fact stopped my permanent GitHub problem: Having too less private repository space.

GitHub:
O – Allows to have as many GitHub repositories as needed
+ – Generates releases out of tags automatically (good semver integration)
– – Charging base is the count of private git repositories

VSTS:
O – Allows to have as many GitHub repositories as needed
+ – Comes with unlimited git repositories, plans are user based
– – Repository management is not that intuitive as it is in other solutions

Pull Requests and Forks
Forks and pull requests are the most important features GitHub introduced very early to support community driven development. I would say in the open source world Github is the platform when it comes to forks and pull requests. Currently I would never think about moving open source repositories away from GitHub because of this great feature.

pull-request.png

When it comes to closed source projects, forking and pull requests are becoming only important in bigger teams with different products or product lines. We are using this feature strongly in our teams at my company. Smaller startups or teams will not use these workflows often but nevertheless it is a road blocker for me to do the 100% switch to VSTS. I guess it took Microsoft around 12 month to deliver it in a more simple way GitHub is doing this.

GitHub
+ – Cross repository forking
+ – Pull requests incl. discussion thread and a lot of community features

VSTS:
O – Supports pull request on repository level

Agile Process support with EPiCs, features and backlogs
When it comes to bigger teams or more structure, people are having the option that to implement a process is the key. This brings me to the biggest enterprise blocker I see in GitHub, the Issue-Tracking system. Companies who migrated to an agile framework like SCRUM or KANBAN need to have the option to work with features, backlogs or bugs. Microsoft delivers with VSTS a highly customizable and adaptable work item management system. The SCRUM and KANBAN template makes perfect sense for agile teams but also the traditional waterfall model can be implemented (even if I don’t understand why someone should do this.)

backlog.png

GitHub
– – It’s just an Issue Tracker
+ – Has good integration into many cloud services

VSTS:
+ – Offers customisable work item management
+ – Comes with templates for agile team structures

Handle your Test-Cases
Even if your projects comes with a great code coverage and good unit tests, the requirements to execute manual tests or just to orchestrate automated integration tests exists. VSTS implements based on the work item management a test case management which has the option to integrate it with automation bots via WinRM and other protocols.

bot

The ability to document test cases and write specific step by step guides how to verify a feature is a big plus esp. in small teams where no dedicated QA resources are hired.

GitHub
O – Ability to integrate with external QA services
– – No integrated test case management

VSTS:
O – Ability to integrate with external QA services
+ – Test Case management is part of the work item management

Centralised Source Code management as migration path
For a couple month Microsoft offers virtual TFS collection, which allows companies that want to go pave the road for git based repositories to stay with the existing centralised source code management besides new git repositories. In the early day VSTS just supported a TFS collection per project space but now maintaining TFS collection is that easy as it is creating new git repositories. This will become very important features for existing TFS customers.

new-repo.png

Revised Build-System incl. Linux Support
I guess Microsoft learned very fast that the XAML file based build system was very inflexible and complicated for a SaaS service like VSTS. Because of that a couple month ago a new step based build system was introduced which will orchestrate the build agent out of VSTS

build-task.png

Since Microsoft supports Windows, Linux and Mac build agents there are no road blockers anymore, besides that the hosted build services for VSTS are very rare. There is a build server Microsoft offers out of the box but from my experience you will get more problems customizing that. When you are focused on Azure check also what the Azure App Services can do for you because KuduSync offers out of the box build for your .NET application during deployment.

 GitHub
+ – Many different build services available with GitHub integration (CodeShip, T..)
– – Build definitions are not part of the code project
– – No release management to aggregate several projects 

VSTS:
– – Hosted build services for VSTS rare
+ – Build definitions are part of the code project
+ – Release Management allows to aggregate several sub projects

Other services and options:
There are also other options and products on the market and I guess one of the most popular one is Assembla which is pretty comparable to Visual Studio Team Services. Also the products from Atlassian (Jira, BitBucket) are great options supporting your development cycle. This article had the intention to support companies who are dealing with GitHub and / or On Premise TFS and now are thinking about combining the positive of both.

I personally think GitHub could become a great option for enterprises as well, when the Issue-Tracker problem is solved which was mainly the reason why I searched for an alternative!

Deploy AngularJS-Apps to Azure WebSites with Codeship

The Azure Cost Monitor is a SaaS application which is extended and improved frequently. Updates take place several times a week without interrupting end users. This agile approach of software development requires continuous integration and a structured deployment process to keep quality and development on a high level. Written in javascript – nodejs for the backend and angularjs for the frontend – the application is deployed to Azure WebSites, the fully managed web hosting solution of Microsoft.

Azure supports deployment from GitHub which works very well for nodejs applications, but angularjs applications need to be compiled to minify the code and rename the images, what prevents caching issues in the browser. The guys from Codeship are offering one of the best cloud platforms to enable continuous deployment for Azure WebSites and many other services.

This tutorial describes a continuous deployment process for an angularjs application to Azure WebSites, based on Codeship. The source code is hosted in a public GitHub repository and the angularjs app is scaffolded with yeoman.

Step 1: Create your AngularJS application

First of all a new Angular application needs to be created with the following yeoman command:

yo angular

This example uses Sass with Compass and Bootstrap, so this options need to be selected in the creation wizard of yeoman. After creating the application it could make sense to test if everything is generated correctly, by starting the development server with this command:

grunt serve

grunt-wiredep is a grunt task which is responsible for updating all the HTML files and minify the JS/CSS files. This task has an issue in version 1.7.0 so it needs to be updated to version 1.9.0 via package.json. The following line needs to be replaced in the package.json:

“grunt-wiredep”: “^1.7.0”,

to

“grunt-wiredep”: “^1.9.0”,

Last but not least the updated package needs to be installed with

npm install

Bower is the component which is used to install all needed web components. The Codeship sandbox has no bower installed out of the box, so the dependency needs to be added with the following command to the package.json as well:

npm install bower –save-dev

Besides that, the commandline interface for grunt needs to be part of the package.json, so that it becomes installed into the Codeship sandbox:

npm install grunt-cli –save-dev

Step 2: Beam Compass & Sass into the Codship sandbox

YeoMan is using Sass and Compass for modern CSS compilation, so it’s required in the Codeship sandbox as well. All used tools are ruby gems so a simple Gemfile with the following content defines the dependencies:

source “https://rubygems.org”

gem ‘sass’, “3.2.9”
gem ‘sass-globbing’, “>= 1.1.0”
gem ‘compass’, “0.12.2”
gem ‘breakpoint’, “2.0.5”
gem ‘singularitygs’, “< 2.0.0”
gem ‘chunky_png’, “1.3.3”

Alle components need to be installed with the command

bundle install

which generates the Gemfile.lock.

Step 3: Activate the CI build in Codeship

All changes described in the steps above should be commited in a GitHub repository. After that everything is prepared to create a new project in Codeship which is connected to the GitHub repository:

Screen Shot 2014-12-20 at 23.11.09

The following setup commands of the Codeship projects should be entered to install all dependencies and kick off the angular build:

rvm use 1.9.3
bundle install
npm install
bower install
grunt build

All the build output is stored in the dist directory. After all preparation, a simple push to the projects GitHub repository lets Codeship start building your application instantly. The first build takes a little bit longer because Codeship prepares the dependency caches. The second one should be done in about 1:30 minutes.

Step 4: Prepare your Azure WebSite

A new Azure Website needs to be created in the Azure Management Portal. Every Azure WebSite supports different ways to publish content, besides traditional FTP Azure WebSites supports deployment from source control. In the specific case of this tutorial the deployment from source control feature should be set to the option “Local Git Repository”:

Screen Shot 2014-12-20 at 23.13.10

Screen Shot 2014-12-20 at 23.14.12

This means Azure hosts a git repository and everything that is committed into this repository will become active in the Azure Website. After that, the next goal is to let Codeship commit all changes into this repository after every successful build.

Step 5: Bring deployment online

Codeship allows to add a deployment script under the project settings for specific branches. In this sample every committed change from the master branch is deployed. In a production environment the system should only be triggered from a specific deployment branch, e.g. deploy/azure.

The following script deploys the compiled angular app to the Azure Website:

# Config git
git config –global user.email “$GITMAIL”
git config –global user.name “$GITUSER”
# Clone the whole azure repository
cd
git clone $GITREPO azure
# Add the compiled app
cd azure
rm -R -f *
cp -R -f ~/clone/dist/* .
git add -A
git commit -m “Code shipped”
# push to azure
git push origin

Last but not least, all used variables need to be stored as environmental settings in Codeship. This prevents that Codeship prints out sensitive data to the logs and decouples configuration settings from deployment script:

Screen Shot 2014-12-20 at 23.15.09

The GITREPO variable contains the https based git URL from the local git repository of the Azure WebSite. It includes username and password in the URL, e.g.

https://{{user}}:{{password}}@{{website}}.scm.azurewebsites.net:443/{{website}}.git

The deployment credentials can be found in the Azure portal for the Azure website.

Finally a simple push into the Git repository of the project triggers a build via Codeship and a deployment into the right Azure WebSite. Users do not loose access to the SaaS application except for a couple seconds after redeploying when the IIS load the new application.

This fully automated process supports every agile software development process and helps you to focus on making features and not updating servers.

Happy Deploying 🙂

private bower components, a simple solution

Bower is an amazing solution to bring structure into javascript based projects. Without bower the reusing of components on git repositories would be a mess. During my current project I searched for a solution to integrate private bower based components into my closed source project. All I had was a private git server with the option to create infinite repositories.


When you google you find many options to setup a separate bower registry which means the backend behind bower. This is very useful if you want to search in a database for a component. This approach also helps bigger organisations to allow everybody to publish a component and the rest of the research and development department should be able to find it.

In our case the situation was more simple. We are a very small team and everybody is able to see our official git repositories on our centralized git server. Only repositories on this server are allowed to be used in customer facing projects. There are many private git repositories but these do not contain public code. Coming from this situation we wanted a solution which comes without an extra server component.

Searching again made me sure that it should be possible to add a git url into the bower.json file. Our git server is configured for the https protocol only and for this just copying the repository url did not work. After checking out the bower code base a solution was on the horizon:

git+https://YOURGITREPO

The important thing here, git+https. This gives the bower code the hint to use the git protocol over http. Just using https:// would not work because bower thinks it’s a http based directory download.

Small teams should be able to work well with this solution, especially when the git server is part of a team management system which contains wiki and document components as well.

git-tf for Homebrew

A couple weeks ago Microsoft released a tool chain called git-tf. It’s a great working git-TFS bridge which is working much better then the old SVN-Bridge. The best at all now active component on the TFS server needs to be installed. Check out the blog comment and the project on codeplex:

http://gittf.codeplex.com/

http://www.infoq.com/news/2012/08/git-tf_oss

I’m using this tool for our MAC OS X Development and it’s awesome. To simplify the setup of this java based implementation I created a Homebrew Formula and created a pull request for merging  into the master. Cross the fingers and vote for it 🙂

https://github.com/mxcl/homebrew/pull/14423

If you want to use my fork in your brew installation pleas use the following command line

cd `brew --prefix`
git remote add git-tf-fork https://github.com/dei79/homebrew.git
git pull git-tf-fork master
brew install git-tf

Comments and contributions to this Homebrow Formula ar welcome