Several years ago I started building a bigger project as a Software as a Service application. Beside all the different technical requirements, being able to work directly on my MacBook Pro without starting virtual machines, was a big wish. At this time a tool chain based on Node.js, Express, NPM and WebStorm was available. Over the years building backend services with Node.js, and this means with JavaScript, felt like rapid prototyping. Getting started is very fast and lightweight but when the project grows compile time features like a strong type system are missing. Year over year I did reviews how to get esp. the beauty of C# and the powerful compiler infrastructure of .NET back.
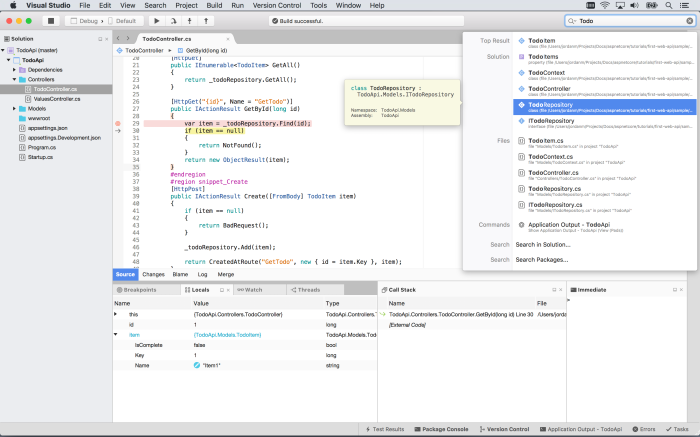
In the last month Microsoft released Visual Studio for Mac and with it the investments into .NET Core increased. Building backend services in Visual Studio for Mac based on .NET Core and ASP.NET Core including the out of the box support in Azure App Services is definitely what I was looking for.
Because of that I decided to give it a spin. After a couple weeks working with the framework I can say it was the right decision because of the following key reasons:
Full managed and type safe environment based on the powerful C# compiler
Broad ecosystem for components similar to NPM via NuGet
Ability to convert runtime errors in compile time errors
Hosting the results on Linux, Docker Containers or just Azure App Services
ASP.NET Core comes with out of the box easy to use Dependency Injection system
ASP.NET Core learned and steeled the best things from the node + express chain
C# Attribute and Extension-Classes are unbeatable to beatify your code
And last but not least everything works well on my MacBook Pro without the need of a single virtual machines – Thanks Microsoft for letting me keep the platform I love!
Azure App Services and the open source project KuduSync behind this great Azure Service is a huge time saver for agile teams. Especially DevOps teams will like the continuous deployment features. Personally I focus a lot on the Git based deployment which enables you to roll back and forward in seconds whenever it is required. Beside that, it is possible to work with standard tools available on market to implement continuous deployment or integration.
When I started working with Azure App Services building Node.js apps, I wrote a little node package called Azure Deploy. It allowed me to push changes as part of a build process directly into the Azure App Service. Originally, CodeShip was the service of choice for the build process but since I need to support Git Repositories beside GitHub, BitBucket and GitLabs, I migrated to Visual Studio Team Services (VSTS) and the integrated build platform.
After several months and hundreds of deploys, which means hundreds of commits to the local git repository, it became a fairly complex and fat thing. This is normally not a problem but my Azure Deploy package clones the local git repository from Azure App Service to a temp directory and copies the build output over it. Last but not least it commits and pushes the changes back to Azure. The big repository took more than 4 minutes to clone so I was wondering if I can use Shallow Clone to get only the latest state of the repository.
This idea works well on Unix based git servers, on GitHub or even in Visual Studio Team Services as well. But when you try to clone a local Git Repository of Azure App Services via Shallow Clone option
it ends up with an error. The error and its background is also documented in the GitHub project of KuduSync here. So what to do now?
Another nice option of Azure App Services is the option to pull changes from a Git Repository instantly after a commit. This works well in VSTS, based on GitHooks but also with GitHub and a couple other platforms. It’s also possible to clone via shallow clone flag from these repositories which closes the loop. The final solution is to commit into a VSTS or GitHub hosted publishing repository which triggers a pull deployment in Azure App Services.
At the end this change reduced the whole deployment time from 5 up to 9 minutes, down to approx. 90 seconds. You can find the updated Azure Deploy component in the NPM registry here.
Microsoft Azure offers a very powerful and cheap queueing system, based on Azure Storage. The node module azure-queue-client is a powerful component for node developers in order to interact with the Azure queues easily.
The updated version of the azure-queue-client now supports delayed jobs. This makes it possible to easily delay a running job in the queue worker for a specific time, .e.g. 5 minutes, 1 hour or any other time less than 7 days in the future.
// config with your settings
var qName = '<<YOURQUEUENAME>>';
var qStorageAccount = '<<YOURACCOUNTNAME>>';
var qStorageSecret = '<<YOURACCOUNTSECRET>>';
var qPolling = 2;
// load the module
var azureQueueClient = new require('../lib/azure-queue-client.js');
// create the listener
var queueListener = new azureQueueClient.AzureQueueListener();
// establish a message handler
queueListener.onMessage(function(message) {
// just logging
 console.log('Message received: ' + JSON.stringify(message));
 console.log('Message Date: ' + new Date());
// generate the delay policy
 var exponentialRetryPolicy = new azureQueueClient.AzureQueueDelayedJobPolicies.ExponentialDelayPolicy(1, 5);
// delay the job
 console.log("Job was delayed " + exponentialRetryPolicy.count(message) + " times");
 console.log("Delaying the job by " + exponentialRetryPolicy.nextTimeout(message) + " seconds");
 return queueListener.delay(message, exponentialRetryPolicy);
});
// start the listening
queueListener.listen(qName, qStorageAccount, qStorageSecret, qPolling, null);
As the code sample shows, the module relies on the concept of delay policies. Implementing custom policies is allowed and supported. Built-in policies are the exponential delay policy and the static delay policy.
The module is actively used and maintained in the azure costs service, so it can be used in production. If you would like to contribute or get more detailed information, please visit the github project page.
Microsoft Azure Active Directory is a steady growing identity- and access-management platform which can be used from developers to swap out user management, authentication and authorisation. Azure Active Directory offers several end points and authentication protocols e.g. SAML2, WS-FED or oAuth2. A widely adopted protocol is oAuth2 which ends up with an issued JWT token. This article describes how the JWT token issued by Azure Active Directory can be verified in a node.js application.
Anatomy of a JWT
A JWT token is a non-encrypted digitally signed JSON payload which contains different attributes (claims) to identify the user.
The header is very static and should be used to identify which algorithm was used for the digital signing. This signing algorithm needs to be used to verify the digital signature in the node.js application later on. The payload contains the JSON object with all the claims and information which can be used to verify the user. Trusting this content is only possible when the digital signature of the token is valid and some standard claims, e.g. the issuer or the audience are verified. Otherwise it could be that someone else generated a JWT (man in the middle attack) to get unauthorised access to your application. The signature is the last part of the JWT and needs to be used for verification of the payload. This signature was generated with the algorithm described in the header to prevent unauthorised access.
How AAD issues a token
Azure Active Directory offers every developer the possibility to create applications. If this application is a multi tenant application, other active directory administrators are able to install this application into their directory. At the end of the day an Azure Active Directory application can live in many tenants. Every tenant in the AAD ecosystem has an own set of keys and certificates which are used to sign cryptographic messages. This means that when a directory with the Id “DIRAAA” issues a token for an application the issuer would be
So the node.js application needs to verify if the token was issued from the directory we expect. Another side effect of this is, that Azure Active Directory uses different keys for every tenant to issue tokens. This means that the validation code needs to get the right verification key for the token. Microsoft uses RS256 for JWTs issued via oAuth2, so the right certificate needs to be downloaded from somewhere.
Download the right certificates
Microsoft publishes the certificates (public portion of the signing keys) as part of the well known OpenId configuration. It can be downloaded here:
The result is a JSON payload which contains the jwks_uri that should be used to download the certificates. Behind the URI several certificates are available and we currently don’t know which the right one is. The simplest way would be to do a little brute force and verify the JWT against every certificate.
Verification Strategy
Inventing code which is able to verify any AAD issued JWT, without knowing if the application is a multi-tenant or single tenant application is the goal. The following process describes a possible algorithm which can be implemented with existing JWT libraries very easily:
Decode the token to extract the tenant-id because the tenant-id is part of the payload, stored as tid-claim. (!!! Currently we don’t know if we can trust this information !!!)
Download the signing certificates from the well known openid configuration endpoint Microsoft provides. The end point url can be generated with the help of the tenant-id.
Verify the JWT with RS256 against the downloaded certificates. For this, every existing JWT module can be used.
After the token is validated check if the iss-claim contains the same value we expect from the tenantid.
After this process the system verifies the token and we know that this token was issued by Azure Active Directory for the described tenant. This means we are now able to rely on this information.
Node.js integration
All described steps are implemented in a small node package which allows to verify a given token as long as the node application has internet access and can download the certificates. The component can be installed via:
npm install azure-ad-jwt –save
A basic example to verify a given token could look like this:
This file contains hidden or bidirectional Unicode text that may be interpreted or compiled differently than what appears below. To review, open the file in an editor that reveals hidden Unicode characters. Learn more about bidirectional Unicode characters
The component is currently not intended to be an express middleware but it’s easy to extend it that way. A good starting point is the express-jwt middleware which should be used as starting point. The current implementation does not work with certificate caching, so when your system has a huge amount of verification requests it makes no sense to download the certificates during every request. This can be done once when the application starts or in a small cache implementation which invalidates the certificate when it was expired as well.
I hope this helps everybody in the node.js space to integrate Azure Active Directory very fast and easily. The described component is used from the Azure Cost Monitor in the production environment so feel free to integrate the package also in your real world applications.
So when you have any questions, feel free and leave a message on this blog.
With Azure App Services (aka. Azure WebSites), the Microsoft Azure cloud offers a great, highly scalable and simple way to host cloud and SaaS services. Besides ASP.NET, several other platforms and languages are supported, e.g. node.js, Python or Java. I personally prefer hosting services written in node.js on this nice managed service of Microsoft.
A common problem for web-services are background jobs like e.g. sending out e-mails or calculating some sales numbers once a day. This use-case can be addressed with Azure WebJobs which are running on the same instance as the web service itself. Jamie Espinosa described the behaviour of WebJobs on an Azure Friday very well. Azure Friday is BTW hosting a whole series about Azure WebJobs, so check it out to get more information.
Normally when deploying a web service into the Azure WebSite the associated WebJobs will be restarted out of the box. A special thing of node.js based Azure WebJobs is that only when the run.js file is changed the WebJob will be restarted. This means when the system just changes an other module or updates the npm dependencies no restart will be enforced.
The whole deployment is based on the Kudu-Project and this project offers so called Post-Deployment-Action-Hooks to trigger a simple script right after the successful deployment of the sources. When ever the run.js file becomes touched the system just restarts the web service, so the solution for this deployment issue was to write a short batch which touches all run.js files:
@echo off

echo Restarting all WebJobs
for /R ..\wwwroot\App_Data\jobs %%G IN (*run.js) DO echo Touching %%G
for /R ..\wwwroot\App_Data\jobs %%G IN (*run.js) DO touch %%G

exit 0
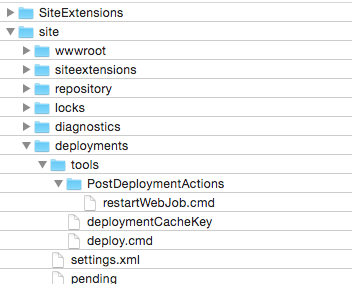
This script can be registered as Post-Deployment-Action-Hook via FTP at every Azure WebSite. Just copy the file to the following location:
This works fine but after all there is still one piece missing: How to get the deployment hooks deployed with git themselves? There are several options to reconfigure the deployment hook directory but I was not able to figure this out. So when you have an idea, feel free and leave a message to discuss any options.
A couple of weeks ago I wrote a tutorial on how to deploy an Angular.js application into Azure WebSites. I explained why the simple GitHub deployment that comes with Azure is not usable and how Codeship as shipping service can do the magic for every team.
Since this article I started using Codeship more extensive and since it’s a part of my daily business I don’t want to miss it at all. Here @Matrix42 HackWeek, Codeship was the most chosen solution to implement AdHoc continuous deployment. I would not be suprised when we replace our traditional TFS build agents in the next months 🙂
To make it more intuitive and easy for everybody who works with node and a javascript task runner, I decided to transform the illustrated deployment script into a node module. The Azure-Deploy module is super simple to integrate in existing NPM driven projects and can be added to existing javascript tasks as well. At the end the system offers a simplified usage like this:
grunt deploy:production
This result is more simple to integrate into the deployment scripts of Codeship than everything else. The shell script of course works but this component gives you the freedom to stay with the current task runner of your choice. To get more information visit the github page for this project: https://github.com/dei79/node-azure-deploy
Microsoft Azure offers a very powerful and cheap queueing system based on Azure Storage. As a node developer the challenge is to build a simple to use system which is able to consume messages from the azure queue. The Azure Cost Monitor is for instance using this module to process all costs analytic tasks in the backend.
The module azure-queue-client is able to implement this in a couple of simple steps. It supports multiple workers in different processes and on different machines. The following example illustrates the usage:
// config with your settings var qName = ‘<<YOURQUEUENAME>>’; var qStorageAccount = ‘<<YOURACCOUNTNAME>>’; var qStorageSecret = ‘<<YOURACCOUNTSECRET>>’; var qPolling = 2;
// load the modules var queueListener = require(‘azure-queue-client’).AzureQueueListener; var q = require(“Q”);
// establish a message handler
queueListener.onMessage(function(message){ var defer = q.defer();
console.log(‘Message received: ‘ + JSON.stringify(message));
defer.resolve();
return defer.promise;
});
// start the listening
queueListener.listen(qName, qStorageAccount, qStorageSecret, qPolling, null);
Developers who are using the Azure Scheduler might recognize that the payload of the scheduler is encapsulated in a XML wrapper. This XML wrapper can be handled by the module as well so that it doesn’t matter if the message comes from an other queue client or the Azure Scheduler.
This module makes writing job workers in node, hosted on Azure or any other cloud provider a breeze.