The Azure Cost Monitor Team is very pleased to announce the launch of the Azure Active Directory support starting today.
Microsoft Azure Active Directory is an identity and access management cloud solution that provides a robust set of capabilities to manage users and groups. It also helps to secure access to cloud applications including Microsoft online services like Office 365.
With the new feature, the Azure Cost Monitor allows to link teams against an existing Azure Active Directory. By doing so, a centralized identity and access management can be realized easily.
The support of Azure Active Directory Groups, enables you to grant access to dedicated groups of people or departments within your enterprise. This ensures an easy integration into your existing IT service infrastructures .
Last but not least, a seamless sign-in experience for all users (single-sign-on) can be generated by combining the Azure Directory setup with the customer buckets feature.
How to get started?
Linking an existing Azure Active Directory to the Azure Cost Monitor is that simple:
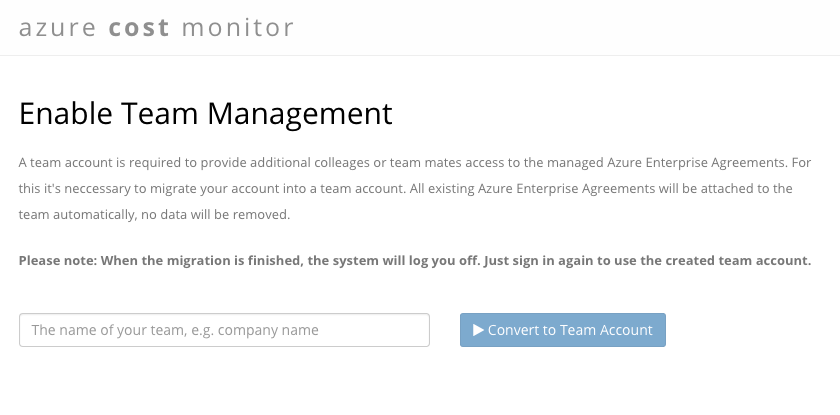
Log in to the Azure Cost Monitor Dashboard and if you don’t have a team account migrate to a team:
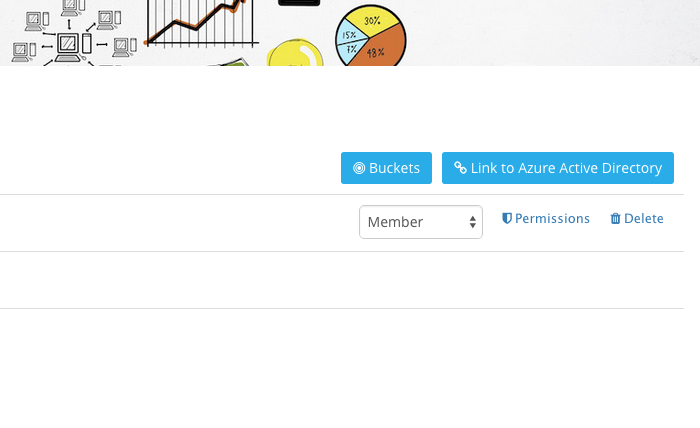
Select the “Link to Azure Active Directory” button to start the setup process
Follow the description and login for the first time with a global administrator of your Azure Active Directory to give the required consent that allows users of your Azure Active Directory to sign in to the Azure Cost Monitor.
After the successful consent save the directory settings. All users of the Azure Active Directory can use the Azure Cost Monitor now.
Configure a new bucket so that all users will be redirected to the Active Directory Sign-In process automatically. This step is optional and can be done later as well.
Interested in the Azure Active Directory feature: The new feature integrates the Azure Cost Monitor more seamless into existing IT service infrastructures and increases the end user experience of your team members and co-workers. Especially the group based permission support allows you to delegate the access management to a centralised IT organisation.
Try the new feature today by simply logging into your Azure Cost Monitor enterprise account. If you don’t have an enterprise subscription, try it for free for a certain time, as we are currently in the technical preview phase.
The Azure Cost Monitor Team is happy to announce the launch of the new customer url feature starting today.
Now, users are able to create as many customer urls for their team as required. These customer urls are called buckets in the Azure Cost Monitor because the system can connect different information and actions with an bucket. Whenever a user visits the Azure Cost Monitor with the generated bucket url the system triggers the preferred sign-in workflow, e.g. Azure Active Directory. In addition the system applies the configured branding, so that every end user gets the same unique experience.
How to get started?
Adding a new bucket to the Azure Cost Monitor is that simple:
Log In to the Azure Cost Monitor Dashboard and if you don’t have a team account migrate to a team:
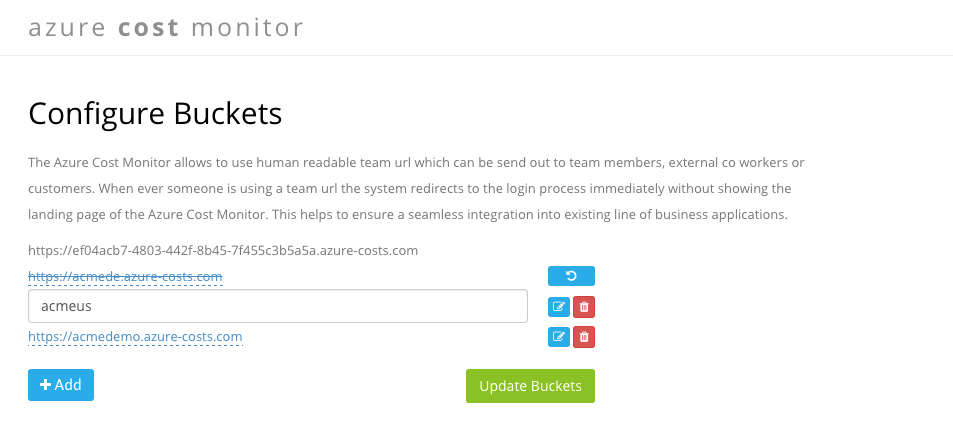
Select the “Buckets” button to open the bucket management view:
Add or remove buckets in this overview
Tip: Every team has a default bucket which is the same as the team id and can be used directly when no custom bucket is created.
Interested in the “customer url – feature”?
The new feature integrates the Azure Cost Monitor more seamless into existing IT service infrastructures and increases the end user experience of your team members and co-workers.
Try the new feature today by simply logging into your Azure Cost Monitor enterprise account. If you don’t have an enterprise subscription, try it for free for a certain time, as we are currently in the technical preview phase.
Microsoft Azure Active Directory is a steady growing identity- and access-management platform which can be used from developers to swap out user management, authentication and authorisation. Azure Active Directory offers several end points and authentication protocols e.g. SAML2, WS-FED or oAuth2. A widely adopted protocol is oAuth2 which ends up with an issued JWT token. This article describes how the JWT token issued by Azure Active Directory can be verified in a node.js application.
Anatomy of a JWT
A JWT token is a non-encrypted digitally signed JSON payload which contains different attributes (claims) to identify the user.
The header is very static and should be used to identify which algorithm was used for the digital signing. This signing algorithm needs to be used to verify the digital signature in the node.js application later on. The payload contains the JSON object with all the claims and information which can be used to verify the user. Trusting this content is only possible when the digital signature of the token is valid and some standard claims, e.g. the issuer or the audience are verified. Otherwise it could be that someone else generated a JWT (man in the middle attack) to get unauthorised access to your application. The signature is the last part of the JWT and needs to be used for verification of the payload. This signature was generated with the algorithm described in the header to prevent unauthorised access.
How AAD issues a token
Azure Active Directory offers every developer the possibility to create applications. If this application is a multi tenant application, other active directory administrators are able to install this application into their directory. At the end of the day an Azure Active Directory application can live in many tenants. Every tenant in the AAD ecosystem has an own set of keys and certificates which are used to sign cryptographic messages. This means that when a directory with the Id “DIRAAA” issues a token for an application the issuer would be
So the node.js application needs to verify if the token was issued from the directory we expect. Another side effect of this is, that Azure Active Directory uses different keys for every tenant to issue tokens. This means that the validation code needs to get the right verification key for the token. Microsoft uses RS256 for JWTs issued via oAuth2, so the right certificate needs to be downloaded from somewhere.
Download the right certificates
Microsoft publishes the certificates (public portion of the signing keys) as part of the well known OpenId configuration. It can be downloaded here:
The result is a JSON payload which contains the jwks_uri that should be used to download the certificates. Behind the URI several certificates are available and we currently don’t know which the right one is. The simplest way would be to do a little brute force and verify the JWT against every certificate.
Verification Strategy
Inventing code which is able to verify any AAD issued JWT, without knowing if the application is a multi-tenant or single tenant application is the goal. The following process describes a possible algorithm which can be implemented with existing JWT libraries very easily:
Decode the token to extract the tenant-id because the tenant-id is part of the payload, stored as tid-claim. (!!! Currently we don’t know if we can trust this information !!!)
Download the signing certificates from the well known openid configuration endpoint Microsoft provides. The end point url can be generated with the help of the tenant-id.
Verify the JWT with RS256 against the downloaded certificates. For this, every existing JWT module can be used.
After the token is validated check if the iss-claim contains the same value we expect from the tenantid.
After this process the system verifies the token and we know that this token was issued by Azure Active Directory for the described tenant. This means we are now able to rely on this information.
Node.js integration
All described steps are implemented in a small node package which allows to verify a given token as long as the node application has internet access and can download the certificates. The component can be installed via:
npm install azure-ad-jwt –save
A basic example to verify a given token could look like this:
This file contains hidden or bidirectional Unicode text that may be interpreted or compiled differently than what appears below. To review, open the file in an editor that reveals hidden Unicode characters. Learn more about bidirectional Unicode characters
The component is currently not intended to be an express middleware but it’s easy to extend it that way. A good starting point is the express-jwt middleware which should be used as starting point. The current implementation does not work with certificate caching, so when your system has a huge amount of verification requests it makes no sense to download the certificates during every request. This can be done once when the application starts or in a small cache implementation which invalidates the certificate when it was expired as well.
I hope this helps everybody in the node.js space to integrate Azure Active Directory very fast and easily. The described component is used from the Azure Cost Monitor in the production environment so feel free to integrate the package also in your real world applications.
So when you have any questions, feel free and leave a message on this blog.
The Azure Cost Monitor Team is happy to announce the launch of the new branding feature, starting today.
Now, Azure Cost Monitor users can customize their application with the title, color schemes and images of their choosing, for a more seamless integration into already existing IT processes of an enterprise. This new feature also enables Cloud Service Providers and Resellers to offer the Azure Cost Monitor as a White-Label-Solution.
How to get started?
Adding a customized branding to the Azure Cost Monitor is this simple:
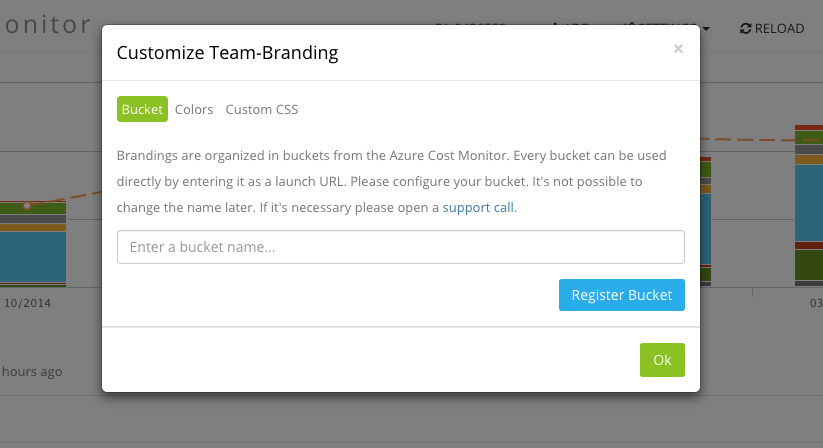
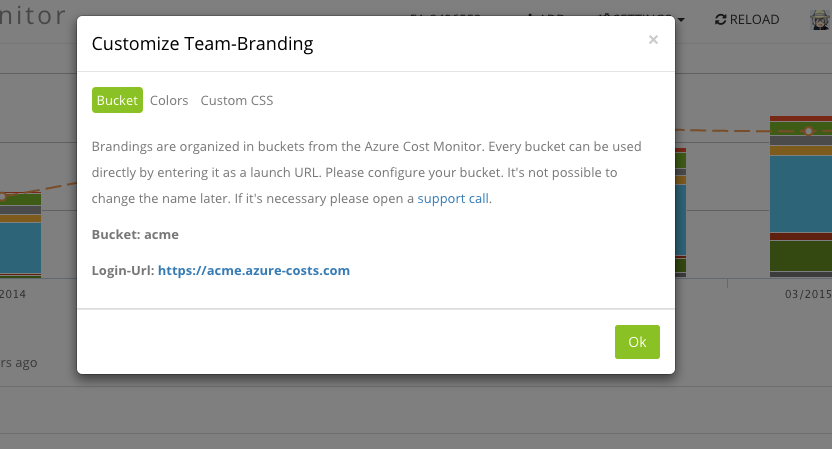
Define a bucket name to give your customizing a unique launch URL.
Define your customized header title, color schemes, button colours or even add a custom CSS for advanced styles. Changes will be shown in the dashboard immediately.
Once you have configured the custom branding, the users will see the branded pages after they have entered their bucket URL, which can simply be deployed e.g. as browser favourite.
Interested in the branding feature? The new branding feature leads to an higher acceptance and identification within an enterprise and makes azure cloud cost management seamless and comfortable.
Try the new branding feature today by simply logging into your azure cost monitor enterprise account. If you don’t have an enterprise subscription, try it for free for a certain time, as we are currently in the technical preview phase.