Review: GitHub vs. Visual Studio Team Services (VSTS) – Should you switch?

Disclaimer: This article is about Visual Studio Team Services (VSTS) and GitHub. The author has a very positive opinion about both services and does not get any offers from Microsoft or GitHub writing this article. The whole article is written IMHO.

Over the last years GitHub has become a success factor for projects related to git repositories for me personally. I also tested several other solutions but mainly I struggeled with the performance or the usability. About 2 years ago I started using Visual Studio Team Services (VSTS) with a work related project. The service looked promising but had a lot of early release issues, so in the last 24 months it was interesting to see how a promising solution became adult. Last week I decided to move away from GitHub for all my closed source projects and rely on Visual Studio Team Service (VSTS). This article gives a deeper look on the main reasons of why I did the move and may help deciders to get detailed information before implementing:

Git-Repository sprawl
Nowadays thanks to bower, npm, bundler or NuGet the amount of Git repositories are growing steadily. When you are focused on component based software development Git is a great helper but the amount of repositories is sprawling because very often every component has its own live in a separated Git repository, which means you have a separate release cycle and a different versioning compared to your main project.

vsts-git

I guess this is the secret source of component managers which are working closely together with git repositories. Of course VSTS and GitHub are supporting multiple git repositories but GitHub lets you pay on a package on git repositories, VSTS lets you pay for users. Especially for small teams paying for users is the better deal, compared to paying for repositories. At the end Microsoft offers a smaller groups of 5 everything for free. This fact stopped my permanent GitHub problem: Having too less private repository space.

GitHub:
O – Allows to have as many GitHub repositories as needed
+ – Generates releases out of tags automatically (good semver integration)
– – Charging base is the count of private git repositories

VSTS:
O – Allows to have as many GitHub repositories as needed
+ – Comes with unlimited git repositories, plans are user based
– – Repository management is not that intuitive as it is in other solutions

Pull Requests and Forks
Forks and pull requests are the most important features GitHub introduced very early to support community driven development. I would say in the open source world Github is the platform when it comes to forks and pull requests. Currently I would never think about moving open source repositories away from GitHub because of this great feature.

pull-request.png

When it comes to closed source projects, forking and pull requests are becoming only important in bigger teams with different products or product lines. We are using this feature strongly in our teams at my company. Smaller startups or teams will not use these workflows often but nevertheless it is a road blocker for me to do the 100% switch to VSTS. I guess it took Microsoft around 12 month to deliver it in a more simple way GitHub is doing this.

GitHub
+ – Cross repository forking
+ – Pull requests incl. discussion thread and a lot of community features

VSTS:
O – Supports pull request on repository level

Agile Process support with EPiCs, features and backlogs
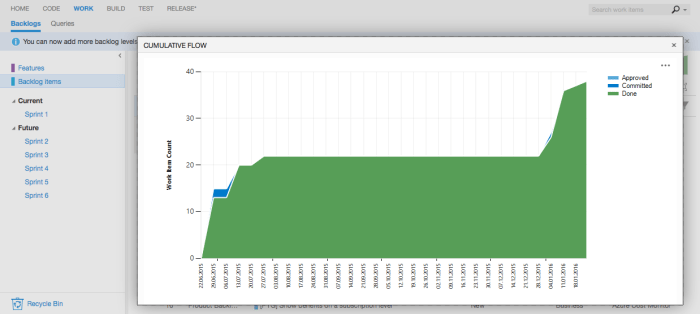
When it comes to bigger teams or more structure, people are having the option that to implement a process is the key. This brings me to the biggest enterprise blocker I see in GitHub, the Issue-Tracking system. Companies who migrated to an agile framework like SCRUM or KANBAN need to have the option to work with features, backlogs or bugs. Microsoft delivers with VSTS a highly customizable and adaptable work item management system. The SCRUM and KANBAN template makes perfect sense for agile teams but also the traditional waterfall model can be implemented (even if I don’t understand why someone should do this.)

backlog.png

GitHub
– – It’s just an Issue Tracker
+ – Has good integration into many cloud services

VSTS:
+ – Offers customisable work item management
+ – Comes with templates for agile team structures

Handle your Test-Cases
Even if your projects comes with a great code coverage and good unit tests, the requirements to execute manual tests or just to orchestrate automated integration tests exists. VSTS implements based on the work item management a test case management which has the option to integrate it with automation bots via WinRM and other protocols.

bot

The ability to document test cases and write specific step by step guides how to verify a feature is a big plus esp. in small teams where no dedicated QA resources are hired.

GitHub
O – Ability to integrate with external QA services
– – No integrated test case management

VSTS:
O – Ability to integrate with external QA services
+ – Test Case management is part of the work item management

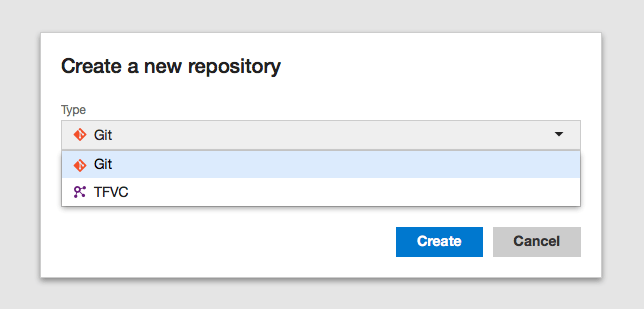
Centralised Source Code management as migration path
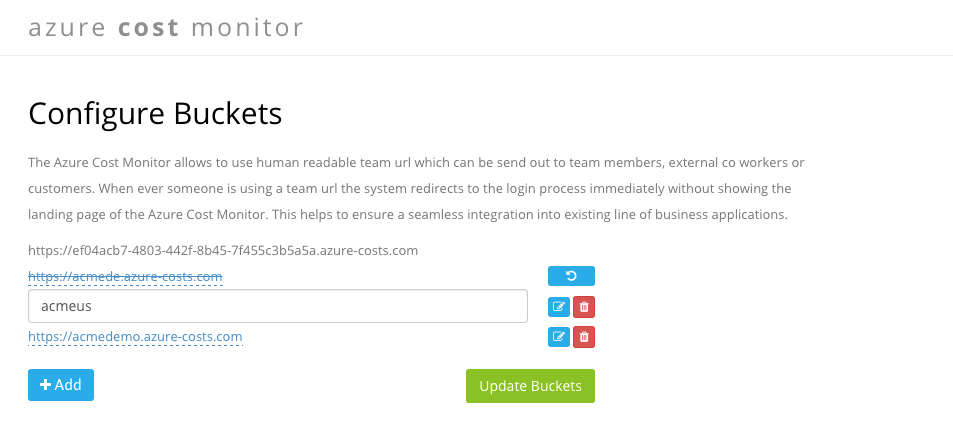
For a couple month Microsoft offers virtual TFS collection, which allows companies that want to go pave the road for git based repositories to stay with the existing centralised source code management besides new git repositories. In the early day VSTS just supported a TFS collection per project space but now maintaining TFS collection is that easy as it is creating new git repositories. This will become very important features for existing TFS customers.

new-repo.png

Revised Build-System incl. Linux Support
I guess Microsoft learned very fast that the XAML file based build system was very inflexible and complicated for a SaaS service like VSTS. Because of that a couple month ago a new step based build system was introduced which will orchestrate the build agent out of VSTS

build-task.png

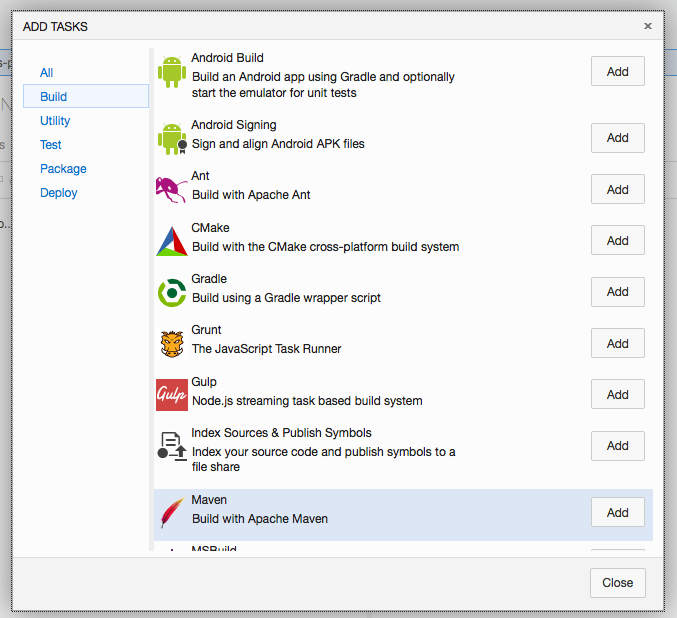
Since Microsoft supports Windows, Linux and Mac build agents there are no road blockers anymore, besides that the hosted build services for VSTS are very rare. There is a build server Microsoft offers out of the box but from my experience you will get more problems customizing that. When you are focused on Azure check also what the Azure App Services can do for you because KuduSync offers out of the box build for your .NET application during deployment.

 GitHub
+ – Many different build services available with GitHub integration (CodeShip, T..)
– – Build definitions are not part of the code project
– – No release management to aggregate several projects 

VSTS:
– – Hosted build services for VSTS rare
+ – Build definitions are part of the code project
+ – Release Management allows to aggregate several sub projects

Other services and options:
There are also other options and products on the market and I guess one of the most popular one is Assembla which is pretty comparable to Visual Studio Team Services. Also the products from Atlassian (Jira, BitBucket) are great options supporting your development cycle. This article had the intention to support companies who are dealing with GitHub and / or On Premise TFS and now are thinking about combining the positive of both.

I personally think GitHub could become a great option for enterprises as well, when the Issue-Tracker problem is solved which was mainly the reason why I searched for an alternative!

Get notified about new team members

The azure costs team is pleased to announce the launch of the team admin notification support.
The new feature enables team managers and administrators to get notified when a team member activates his account. A team administrator gets a message when a user accepts the invitation or is joined automatically when accessing the service via Azure Active Directory account.

settings-team

How to get started?
The team administrator notification feature is part of every enterprise subscription. Enabling the notification in azure costs is this simple: 

1) Log in to the azure costs Dashboard and if you don’t have a team account migrate to a team (optional): 

team-02-migrate-team

2) Select “Manage Team”  in the drop down on the avatar and open the newly introduced settings page.

3) Just switch the notification on with the displayed checkbox:

settings-team

Interested in the team notification feature?
Try the new feature today by simply logging into your azure costs service and migrate to a team account. The feature is part of any enterprise plan and part of any trial.

azure-queue-client: delaying jobs made easy

Microsoft Azure offers a very powerful and cheap queueing system, based on Azure Storage. The node module azure-queue-client is a powerful component for node developers in order to interact with the Azure queues easily.    

The updated version of the azure-queue-client now supports delayed jobs. This makes it possible to easily delay a running job in the queue worker for a specific time, .e.g. 5 minutes, 1 hour or any other time less than 7 days in the future.

// config with your settings
var qName = '<<YOURQUEUENAME>>';
var qStorageAccount = '<<YOURACCOUNTNAME>>';
var qStorageSecret = '<<YOURACCOUNTSECRET>>';
var qPolling = 2;
// load the module
var azureQueueClient = new require('../lib/azure-queue-client.js');
// create the listener
var queueListener = new azureQueueClient.AzureQueueListener();
// establish a message handler
queueListener.onMessage(function(message) {
// just logging
 console.log('Message received: ' + JSON.stringify(message));
 console.log('Message Date: ' + new Date());
// generate the delay policy
 var exponentialRetryPolicy = new azureQueueClient.AzureQueueDelayedJobPolicies.ExponentialDelayPolicy(1, 5);
// delay the job
 console.log("Job was delayed " + exponentialRetryPolicy.count(message) + " times");
 console.log("Delaying the job by " + exponentialRetryPolicy.nextTimeout(message) + " seconds");
 return queueListener.delay(message, exponentialRetryPolicy);
});
// start the listening
queueListener.listen(qName, qStorageAccount, qStorageSecret, qPolling, null);

As the code sample shows, the module relies on the concept of delay policies. Implementing custom policies is allowed and supported. Built-in policies are the exponential delay policy and the static delay policy.

The module is actively used and maintained in the azure costs service, so it can be used in production. If you would like to contribute or get more detailed information, please visit the github project page.

New Export-Functionality

We feel very fortunate to have  engaged users who tell us about their cloud data management challenges and the functionality that they’d like to see added to azure costs. And we listen.

We’re continually deploying additional features that our users have been asking for to azure costs and here’s a great new functionality.

Export-Feature:
With the new export functionality our users are able to export their spending data to a CSV format.

excel2.png

In addition, they can control the export to show more or less detailed data by applying the azure cost filter- and grouping functionalities.
This enables every user to export just the right granularity of information and to satisfy all stakeholders in the company.

excel

Interested in the new export feature?
Try the new feature today by simply logging into your azure costs account. The feature is part of any plan, starting from the free Basic plan up to the Enterprise plan.

Any questions, wishes or ideas? Try our feedback portal or drop a mail to help@azure-costs.com.

Website Launch Announcement: azure costs launches new site

The azure costs  team is pleased to announce the launch of their newly designed Web site, which goes live today, and is located at the same address: https://azure-costs.com/.

It has been crafted to reflect what our users told us they need and it also builds upon new technology capable of addressing future needs. azure costs now enables our users to optimize and manage their Microsoft Azure Costs even more intuitively:

Improved and re-designed landing page
We know that landing pages are very important, so we have decided to totally re-design and re-organise ours. Our new landing page now displays all important information like features, purchase- and pricing information, screenshots, a contact form and log-in possibilities.

landing-page

More modern and user-friendly design
The new site design, aside from being aesthetically pleasing, is more agile, interactive, and is easier to scan, read and navigate.
It is using a responsive design, which means that you’ll see essentially the same design optimized for your smart phone, tablet and Desktop.

feature-page

We hope you will visit the new website at https://azure-costs.com/ and acquaint yourself with the new design. And while you’re there, don’t hesitate and let us know what you think by leaving a message. In the coming months, we hope to continue improving the site, so that it best serves all of your Azure cloud cost monitoring needs.

Daily Spending Reports now with extended breakdown options

The azure cost monitor team is pleased to announce the launch of the extended breakdown options in the Daily Spending Reports.

This feature has been built to reflect what our users told us they need – more granular options in the daily spending reports in order to identify the biggest cost drivers and oversee unplanned spikes. The new feature enables users to customize the structure of their spending breakdowns within their reports:

cc-breakdown

Besides the extended breakdown options we added additional information to the spending dashboard as well. From now on it’s easy to filter or group cloud costs by Cost Centers, Departments or Resource Groups within the azure cost monitor dashboard:

acm-cc-new-properties


How to get started?
The spending breakdown is part of your daily spending reports automatically. So no further actions are required to get a crisp overview about your daily spendings. The settings concerning the daily spending report can be adapted in the settings of the contract in the navigation bar.

cc-notification-settings


Interested in the extended spending breakdown options?
Try the new feature today by simply logging into your azure cost monitor. The feature is part of any plan, starting from the free Basic plan up to the Enterprise plan.

Any questions, wishes or ideas? Try our feedback portal or drop a mail to help@azure-costs.com.

Big Data in your browser: Parallel.js

Big Data often has something todo with analysing a big amount of data. The nature of this data makes it possible to split it up into smaller parts and let them be processed from many distributed nodes. Inspired from the team of CrowdProcess we like the idea to use the computing power of a growing web browser grid to solve data analytic problems.

The Azure Cost Monitor does not have the requirement to solve big data problems of user A in the browser of user B, we would never do this because of data privacy but we have a lot of statistic jobs which need to be processed. From an architecture perspective the question comes up why not to use a growing amount of browser based compute nodes connected with our system instead? Starting with this idea we identified that WebWorkers in modern browsers are acting like small and primitive compute nodes in big data networks. The team from the SETI@Home project also gave us the hint that this option works very well to solve big data challenges.

A very simple picture was painted very fast on the board to illustrate our requirements. The user should not be disturbed from the pre-calculation of statistic data in his browser and the whole solution should prevent battery drain and unwanted fan activities:

ParallelJS-Pic01

It’s also important to understand that some smaller devices like a RaspberryPI which is used for internet browsing or an older smartphone is not able to process the job in time to generate a great user experience. Because of this, the picture changed a bit and we invented a principal we call “Preemptive Task Offloading”.

ParallelJS-Pic02

“Preemptive Task Offloading” lives from the idea that the server and the browser are using the same programming language and the same threading subsystem to manage tasks. Because of that the service itself can decide whether it moves tasks in the browser on the end user or pre-calculates them on the server to ensure great user experience.

ParallelJS-Pic03

The illustrated solution is able to improve the user experience for your end users dramatically and lowers the hosting costs for SaaS applications in the same time.


How it works

The first step is to find the lowest common denominator, in our case it’s called JavaScript. Javascript can be executed in all modern browsers and in the server via node.js. Besides this node and web browser has concepts, e.g. WebWorkers to handle multi threading and multi tasking. The second important ingredient is a framework which abstracts the technical handling of  threads or tasks because they are working different in the backend or frontend. We identified parallel.js as a great solution for this because it gives us a common interface to the world of parallel tasks in frontend and backend technologies. Last but not least a system needs to identify the capabilities of the browser. For this we are using two main approaches. The first one tries to identify the capability to spin of web workers and identifies the amount of CPUs. For this we are using the CPU Core Estimator to also support older browsers. The second step of capability negotiation is a small fibonacci calculation to identify how fast the browser really is. If we come to a positive result our system starts the task offloading into the web browser, a negative result leads to a small call against our API to get the preprocessed information from our servers.


Conclusion

After testing this idea several weeks, I can say that this approach helps a lot to build high performance applications, with acceptable costs on the server side. Personally I don’t like the approach to give customer sensitive data into the browser of other customers to much, but I think this approach works great in scientific projects. What do you think about big data approaches in the browser? What are your pitfall or challenges in this area? Just leave a comment bellow or push a message on Twitter.

Azure Cost Monitor announces private and shared filters

The Azure Cost Monitor Team is happy to announce the launch of the new filtering feature, starting today.

Now, users are able to create data filters to get instant access to important or costly services. Filtering enables users to only show results that match a specific criteria. For example a stakeholder may want to only report on a specific tag value or type of cloud service.
It is even possible for team administrators to share created filters with team mates and co-workers, so everyone may stay focused on their cost drivers in the Azure subscriptions.

FilterExpensiveVMs

The system supports a top to bottom “and/or” logic what means that you can create the filters as you would naturally read a sentence. This allows you to combine different attributes in an “and” or “or” clause.


How to get started?
Adding a new filter to the Azure Cost Monitor is this simple:

1) Log In to the Azure Cost Monitor Dashboard and if you don’t have a team account migrate to a team (optional):

team-02-migrate-team

2) Select the “Create Filter” drop down at the spending reports page.

CreateFilter

3) Add several conditions to the filter and save it:

FilterExpensiveVMs

4) Just switch between different filters by selecting the needed one:

SelectFilters

5) If you are the team administrator share a created filter with the team by clicking the “Share with team” button:

ShareFilter


Interested in the filtering feature?
Try the new feature today by simply logging into your Azure Cost Monitor. The feature is part of any plan, starting from the free Basic plan up to the Enterprise plan. 

Any questions, wishes or ideas? Try our feedback portal or drop a mail to help@azure-costs.com.

Daily Spending Reports now with Subscription Breakdown

Getting a displayed number in the daily report isn’t always enough. For staying up to date on a daily basis concerning Azure spendings it’s way better to have a subscription breakdown available which helps to identify the biggest cost drivers or to oversee unplanned spikes.

So the Azure Cost Monitor Team is very pleased to announce the support for subscription breakdowns in the daily spending report, starting today.

subscritpionbreakdown


How to get started?

The subscription breakdown is part of your daily spending reports automatically. So no further actions are required to get a great overview about your daily spendings. As usual, settings concerning the daily spending report can be adapted in the settings of the contract in the navigation bar.


Interested in the Subscription Breakdown feature:
Try the new feature today by simply logging into your Azure Cost Monitor. The feature is part of any plan, starting from the free Basic plan up to the Enterprise plan.

Any questions, wishes or ideas? Try our feedback portal or drop a mail to help@azure-costs.com.

Azure Cost Monitor announces Azure Active Directory support

The Azure Cost Monitor Team is very pleased to announce the launch of the Azure Active Directory support starting today.

Microsoft Azure Active Directory is an identity and access management cloud solution that provides a robust set of capabilities to manage users and groups. It also helps to secure access to cloud applications including Microsoft online services like Office 365.

With the new feature, the Azure Cost Monitor allows to link teams against an existing Azure Active Directory. By doing so, a centralized identity and access management can be realized easily.
The support of Azure Active Directory Groups, enables you to grant access to dedicated groups of people or departments within your enterprise. This ensures an easy integration into your existing IT service infrastructures .
Last but not least, a seamless sign-in experience for all users (single-sign-on) can be generated by combining the Azure Directory setup with the customer buckets feature.


How to get started?
Linking an existing Azure Active Directory to the Azure Cost Monitor is that simple:

  1. Log in to the Azure Cost Monitor Dashboard and if you don’t have a team account migrate to a team:
    team-02-migrate-team
  2. Select the “Link to Azure Active Directory” button to start the setup process
    buckets
  3. Follow the description and login for the first time with a global administrator of your Azure Active Directory to give the required consent that allows users of your Azure Active Directory to sign in to the Azure Cost Monitor.
    linktoaad
  4. After the successful consent save the directory settings. All users of the Azure Active Directory can use the Azure Cost Monitor now.
    aadsettings
  5. Configure a new bucket so that all users will be redirected to the Active Directory Sign-In process automatically. This step is optional and can be done later as well.
    buckets2

Interested in the Azure Active Directory feature:
The new feature integrates the Azure Cost Monitor more seamless into existing IT service infrastructures and increases the end user experience of your team members and co-workers. Especially the group based permission support allows you to delegate the access management to a centralised IT organisation.

Try the new feature today by simply logging into your Azure Cost Monitor enterprise account. If you don’t have an enterprise subscription, try it for free for a certain time, as we are currently in the technical preview phase.

Any questions, wishes or ideas? Try our feedback portal or drop a mail to help@azure-costs.com.