Build your own Twitter – Part 2 – Azure Table Structures

Azure Table Store offers a very important scalability feature which should be used when working with timelines. The partitionkey in every table allows Microsoft to put entities on different servers. Let’s recheck the limits of Azure Table Store to make a right decision (http://azure.microsoft.com/en-us/documentation/articles/azure-subscription-service-limits):

  1. Azure Table Store returns 1000 entities per page. If the result contains more entities the client needs to query several times -> A timeline service should never page to render the first timeline
  2. Azure Table Store returns 2000 entities with 1KB of size per second as a guaranteed SLA –> A timeline service should never request more data per page to stay performant
  3. Azure Table Store allows to store up to 500TB per storage account, it could be stored in one table or different –> A timeline service should be able to handle several storage accounts, at least theoretically.

With all this limitations in mind it’s possible to build a table structure for the timeline service as follows:
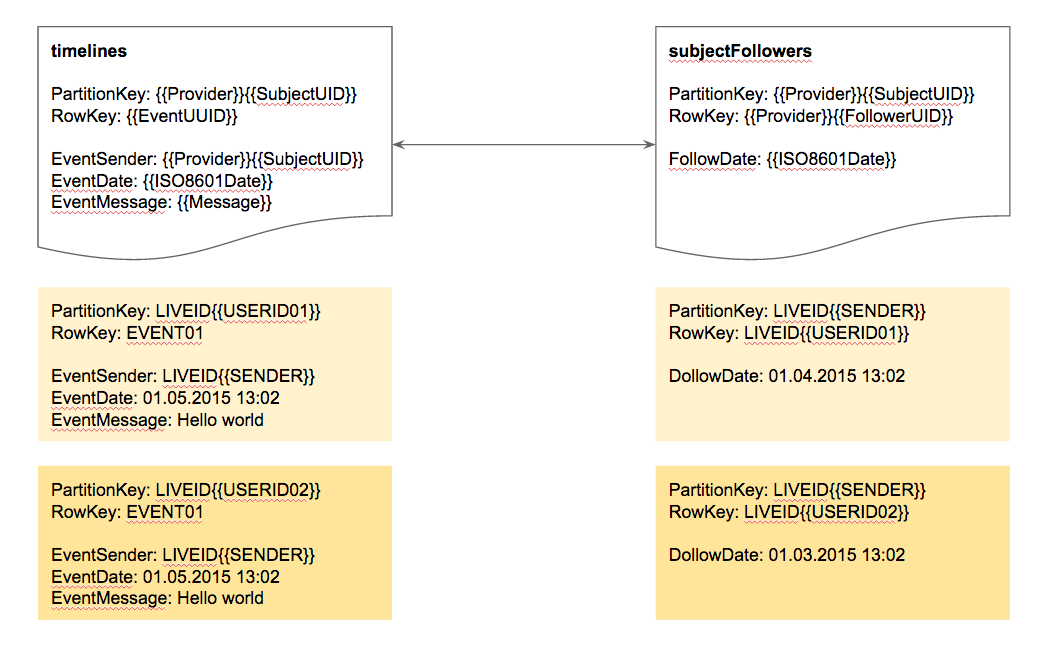
  1. timelines
    The timlines table contains all timelines the system has registered. The partitionkey of this table is timeline identifier so every subjects timeline can be stored on different nodes. The partitionkey should be a key generated from the subjects  identification, e.g. liveid{{UID of LiveId-Token}}. This prevents the system to lookup an other table to get the timeline identifier when the subject tries to render them.In addition the event which should be stored on several timelines can be identified by his event identifier as the row key. This allows the system to also implement removal jobs because a multiple stored event can be identified as the single one.
  2. subjectFollowers
    the subjectFollowers are a list of subjects following a specific subject. The partitionkey of this table is also the subject identifier so it’s easy to get all followers of a subject. In addition the row key becomes important because it identifies the subject who is following someone else. This gives a system the option to find all followers of a specific subject and all subjects a specific subject is following very fast. Works well in both directions.

This simple data structure allows the service to handle hundreds of different timelines and relations. Especially the background worker can now identify on which timeline the event needs to be stored.

followers

Last but not least, when it comes to requesting the timeline content it will only be returned in pages of 250 elements to stay healthy with the performance. An other page can be requested at any time when the user starts paging.

Build your own Twitter – Part 1 – A timeline service with Azure Table Store

The Azure Cost Monitor and many other cloud services I’m working on, needed a timeline service to present aggregated events and actions similar to an audit trail. When I was thinking about this, it came to my mind that the requirements I had were very similar to a Twitter feed but with less features.

Let’s recap what is needed to build a timeline service in general:

  1. The Timeline
    The Timeline is associated with a subject and contains tons of events happened and triggered by other subjects the timeline owner follows.
  2. The Event
    The Event is the incident that happens in the real world and is stored in different timelines. This means every follower of a subject will get the event in his own timeline. So a single event can be stored in many different timelines.
  3. The Subject
    The Subject is someone or something which triggers an event. Normally it is a natural person with an own timeline but it could also be a piece of hard/software.
  4. The Target(s)
    The Targets are subjects with a timeline who are following other subjects. This means every subject becomes a follower or target as soon as it is following an other subject. Posting an event then means sending the message to the timeline of every subject following the sender.

The following picture should give a good overview about the entities in the timeline service:

Screen Shot 2015-03-21 at 10.40.15

Starting with this definitions in mind it’s possible to identify components needed for building a timeline service:

  • Storage for the timeline 
    The storage for the timeline needs to be able to offer a very fast read performance and an OK write performance. The performance should especially not be dependent from the amount of data in the system. I chose Azure Table Store for this because I can store the information in different partitions and get a clear read performance SLA for every partition. In addition to this it’s totally cheap and payable – also for startups.
  • Access broker to the storage 
    Normally NoSQL storage which can be used for timeline access needs a little helper to manage access. In general a RESTful web-service acts as an access broker and hands out pre-signed links to the timeline content. This ensures that no timeline data needs to go through the timeline service at all. Only the pre-authorised access links will be generated for the system. This also means that at the end the client SDK needs to handle the raw data for the timeline. This makes it a bit more complicated but it lets the performance stay in a good range. An other important operation needs to be implemented in the Access broker as well: Posting events to the subjects followers is a slow and complex operation the system needs to implement with a direct server call normally executed asynchronous with the help of a worker job.
  • Metadata storage for subject and targets
    Last but not least the combination of subject & targets needs to be stored somewhere in the backend. Azure Table Store can be used for this as well. All the operations to create a follow-ship can be implemented in the timeline service as well but not the rights & permission checks to post or create relations because the timeline service should be used machine-2-machine with API tokens.

The following graphic shows the technical architecture of a good scalable timeline service based on Azure services:

arch-timeline

The next part of this tutorial will focus on the correct and scalable table structure based on Microsoft Azure Table Storage.

Azure Cost Monitor sends notifications when Azure EA token has expired

Microsoft offers all EA customers the Azure EA portal to manage different accounts and subscriptions. In addition to this portal, every customer can issue up to two security tokens to 3rd party applications. This allows the applications to interact and work with the customers EA data like the Azure Cost Monitor is doing.

Starting this week the Azure Cost Monitor analyses the existing Azure EA security tokens and is able to detect when a token has expired. As soon an expired token is detected the owner of the contract will get an information via mail:

blog-azure-cost-ea-token-expired

In addition, the Azure Cost Monitor is now able to warn about tokens that will expire very soon. The owner of the affected contract will get an information via mail as well:

blog-azure-cost-ea-token-will-expire

This new feature should help you as a contract owner to stay in sync every day. It also helps us to have our system stay healthy and performant every day. Please update the tokens directly when you get this kind of notifications. Additional information on how to renew a token can be found in our knowledge base here.

We hope this feature makes it simple to maintain your Azure Cost Monitor account and makes it much easier for you to manage and control all costs. Any questions, wishes or ideas? Try our feedback portal or drop a mail to tickets@azurecostmonitor.uservoice.com.

Update expired Azure EA tokens easily

The Microsoft Azure EA portal issues an Azure EA security token for API access to the cost & usage data. This token expires every 6 month and because of that needs to be renewed in the Azure Cost Monitor on a regular basis. The Azure Cost Monitor team started the project about 5 months ago what means that the first Azure EA security tokens will expire soon. Because of that, we are pleased to announce the launch of the token update wizard which makes it as easy as possible to renew expired Azure EA tokens:

azure-ea-token-settings

From today, the dashboard of the Azure Cost Monitor warns every user when the token is expired to ensure that every administrator always stays informed:

azure-ea-token-warning

If you don’t update an expired token, the system stops syncing data from the Azure EA portal. As soon as the token is valid again the system is able to sync data from the Azure EA portal and is doing that automatically within the next sync cycle over night. We will also get the missed data from the days the token was expired. So no worries when you were in vacation or absent for a couple days.

We hope this feature makes it simple to maintain your Azure Cost Monitor account and makes it much easier for you to manage and control all costs. Any questions, wishes or ideas? Try our feedback portal or drop a mail to tickets@azurecostmonitor.uservoice.com.

Azure: Do never use EF automigrations when working in teams

Todays number one approach in building database access libraries on ASP.NET based applications is the Entity Framework. Since Microsoft supports migration based database updates, which mostly look like copied from the approach Ruby on Rails offers since ages, it’s possible to use them in scenarios where continuous deployment is key.

The core model which fits perfectly into a development process around continuous delivery & deployment is a code-first approach. This means that the developer creates so called POCOs (Plain Old C# Object) and the system is able to generate the needed SQL changes, based on the current state of the database.

The Entity Framework has two options to generate the migration:

  1. Auto Migrations
    The Entity Framework tries to generate the database changes on runtime without any specific migrations implemented as code. Everything happens magically 😦
  2. Explicit Migrations
    The Entity Framework just runs the migration scripts written in a .NET based special DSL for database operations. Nothing happens magically 🙂 This needs the developers brain but is controllable even in large teams.

When you work in a team Auto Migrations are really a bad idea and should be disabled from the beginning. Assume developers do changes manually in the database which means the magic around AutoMigrations will generate a different set on instructions against this database as the next developer will get. The results of auto migrations in team environments are not reliable and repeatable.

So it’s a really good idea to disable automatic migrations from the start:

public Configuration()  {
AutomaticMigrationsEnabled = false;
}

Auto Migrations do not have a win at all when it comes to projects with more than one developer or projects which are deployed automatically. Continuous deployment relies on a strict unit of work and as less magic as possible. This will also help to troubleshoot when the continuous deployment breaks the production and a rollback is required.

Microsoft also published a nice article with more information at the MSDN: http://msdn.microsoft.com/en-US/data/jj554735.aspx

Manage costs in your local currency – Azure Cost Monitor supports multiple currencies

The azure cost monitor team is pleased to announce the launch of the multi currency support. This  feature has been built to reflect what our users told us they need:

acm_currency

Currently the Microsoft Azure EA portal does not give any information about the currency of the financial data. Because of that the azure cost monitor displayed all costs in EUR in the past. Now the new multi currency support allows to switch between different currencies.

We hope this feature brings more transparency in your Azure Cloud Spendings and makes it much easier for you to manage and control all costs. Any questions, wishes or ideas? Try our feedback portal or drop a mail to tickets@azurecostmonitor.uservoice.com.

Azure Storage: Is the Geo Redundant Mode really required?

Microsoft Azure offers different replication modes for Azure Storage. Every mode approximately doubles the costs for a TB of data. During a great workshop with Patrick Heyde we talked about stamp copies and I asked myself which mode I really needed.

First I took one step back, to identify all requirements I typically have in my projects for a highly scalable, fault safe, redundant storage :

  • When a hard-drive in a storage server brakes, my data still needs to be usable.
  • When Microsoft has huge power outage on a whole datacenter, I want to bring my app up and running again in another datacenter.
  • When I (or my customers) are removing data by accident, there needs to be an option to revert to a former snapshot.

So a review of the different replication modes compared to these requirements leads me to the following results:

When a hard-drive in a storage server brakes, my data still needs to be usable:
The Local Redundant Storage fulfils this requirement perfectly. Microsoft writes 3 different copies of every bit within one single data center. When a hard drive on a stamp or the whole stamp goes down, another one can take over and all data is available without any interruption.

When Microsoft has huge power outage on a whole datacenter, I want to bring my app up and running again in another datacenter:
Microsoft offers a geographical redundant storage mode that stores another 3 copies in another datacenter a hundred miles away. This helps a lot, because every application can use the secondary location to access to the data – but is it worth the price? The price for GRS is three times higher then for LRS.
An automated replication between two different LRS storages, hosted in a Azure WebJob might be a good solution the fulfill the requirement as well.

When I (or my customers) are removing data by accident, there needs to be an option to revert to a former snapshot:
Globally Redundant Storage is not helpful when it comes to removing data by accident. As soon as the data is removed from the primary storage, the system removes the data in the backup location as well, often within seconds.
But this requirement can also be fulfilled with a replication between two different LRS storages, as already described above. The whole application needs to be designed for this use cases.

So this review brings me to the conclusion that in my personal opinion GRS storage is not needed in most of the use cases. Normally several LRS storages and an application logic optimised on the specific data security requirements works well and preserves the budget.

What’s your opinion? Do you have use cases where GRS and Read-GRS are hard requirements? If you like, leave a short comment …

Azure Cost Monitor: Daily Spending Reports – a first résumé

A couple of days ago, on January 17th, the new Daily Spending Report Feature of the Azure Cost Monitor went live.

We are very pleased that the reports were adopted so well. We got some nice feedback from our users appreciating the new functionality.

spending-report-demo

This feature has been build to reflect what our users told us they need – a simple way of tracking all Azure cloud costs on a daily basis and transparency for every stakeholder in the company.

The daily spending reports make it easy for the Operations Department to track the cloud spendings and react upon this data immediately.

Controllers of the Finance Department need to understand what the company is spending throughout the month. Azure Cost Monitor reports give them a convenient way to have a good overview on a daily basis.

Managers always need to be aware about the most important KPIs within the company. The new daily spending reports of the Azure Cost Monitor give them the freedom to always have a quick and precise overview on the company’s cloud spendings.

Whenever you’ve got any questions, wishes or further ideas please don’t hesitate and let us know by leaving a message or request them in our feedback portal.

Stay up to date – Azure Cost Monitor starts sending daily spending reports via mail

The azure cost monitor team is pleased to announce the launch of the daily spending mail reports starting January 17th. This great feature has been crafted to reflect what our users told us they need and it also builds upon new technology capable of addressing future needs:

spending-report-demo

The report will be send once a day, at about 03:00 AM CET. If – for any reason – you do not wish to get the daily reports, it’s of course possible to disable the reports in the new notifications section of the Azure Cost Monitor portal:

notifications

We hope this feature brings more transparency in your Azure Cloud Spendings and makes it much easier for you to manage and control all costs.
Any questions, wishes or ideas? Try our feedback portal or drop a mail to tickets@azurecostmonitor.uservoice.com.

SEO – Is your Azure WebSites hosted AngularJS App ready for Google :-)

Every AngularJS application is just a website which is generated by executing javascript. The google crawler and also other crawlers are not able to collect information from these sites. To handle this problem a couple of services like AjaxSnapshots or Prerender.io are trying to fill the gap. Basically these services are generating a snapshot of a website without any javascript in it. Whenever the search engine visits the page, the system delivers a plain html page without any javascript. Many technical details on how search engines crawl a page can be found here. Users who are hosting on Azure WebSites and trying to use this kind of pre-rendering tools may stuck with some configuration issues.

The required rewrite rules for the web.conf are written very fast or can be found in the AjaxSnapshots documentation:

<?xml version="1.0" encoding="UTF-8"?>
<configuration>
    <system.webServer>
        <rewrite>
            <rules>
                <rule name="AjaxSnapshotsProxy" stopProcessing="true">
                    <!-- test all requests -->
                    <match url="(.*)" />
                    <conditions trackAllCaptures="true">
                        <!-- only proxy requests with an _escaped_fragment_ query parameter -->
                        <add input="{QUERY_STRING}" pattern="(.*_escaped_fragment_=.*)" />
                        <!-- used to capture the scheme/protocol for use in the rewrite below --> 
                        <add input="{CACHE_URL}" pattern="^(https?://)" />
                    </conditions>
                    <!-- send the request to the AjaxSnapshots service -->
                    <action type="Rewrite" 
                    url="http://api.ajaxsnapshots.com/makeSnapshot?url={UrlEncode:{C:2}{HTTP_HOST}:{SERVER_PORT}{UNENCODED_URL}}&amp;apikey=<YOUR API KEY>" 
                    logRewrittenUrl="true" appendQueryString="false" />
                </rule>
            </rules>
        </rewrite>
    </system.webServer>
</configuration>

An example for Prerender.io can be found here.

After applying the web.conf to the website, the browser returns directly a 404 which means that the website behind the target URI is wrong. This is because Azure Websites enabled the redirect module but rewriting URLs to external target requires a revers proxy module additionally. This module which is part of the application request routing in IIS is not activated in Azure WebSites by default. Thanks to the following nice trick it’s possible to use the reverse proxy module also in Azure WebSites:

http://ruslany.net/2014/05/using-azure-web-site-as-a-reverse-proxy/

As usual all technical frameworks, components or services described in this blog are used in production for several weeks in different applications, e.g. the Azure Cost Monitor. These steps should help to get every AngularJS application ready for google and other bots when the site is hosted on Azure WebSites.