We feel very fortunate to have engaged users who tell us about their cloud data management challenges and the functionality that they’d like to see added to azure costs. And we listen.
We’re continually deploying additional features that our users have been asking for to azure costs and here’s a great new functionality.
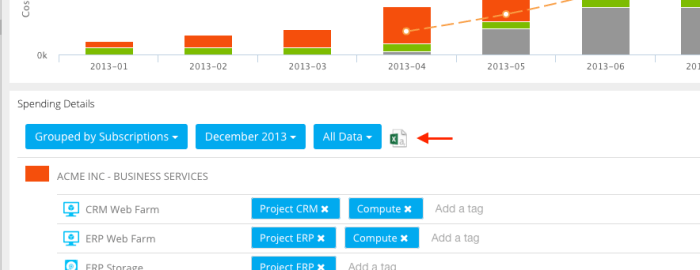
Export-Feature: With the new export functionality our users are able to export their spending data to a CSV format.
In addition, they can control the export to show more or less detailed data by applying the azure cost filter- and grouping functionalities.
This enables every user to export just the right granularity of information and to satisfy all stakeholders in the company.
Interested in the new export feature? Try the new feature today by simply logging into your azure costs account. The feature is part of any plan, starting from the free Basic plan up to the Enterprise plan.
The azure costs team is pleased to announce the launch of their newly designed Web site, which goes live today, and is located at the same address: https://azure-costs.com/.
It has been crafted to reflect what our users told us they need and it also builds upon new technology capable of addressing future needs. azure costs now enables our users to optimize and manage their Microsoft Azure Costs even more intuitively:
Improved and re-designed landing page We know that landing pages are very important, so we have decided to totally re-design and re-organise ours. Our new landing page now displays all important information like features, purchase- and pricing information, screenshots, a contact form and log-in possibilities.
More modern and user-friendly design
The new site design, aside from being aesthetically pleasing, is more agile, interactive, and is easier to scan, read and navigate.
It is using a responsive design, which means that you’ll see essentially the same design optimized for your smart phone, tablet and Desktop.
We hope you will visit the new website at https://azure-costs.com/ and acquaint yourself with the new design. And while you’re there, don’t hesitate and let us know what you think by leaving a message. In the coming months, we hope to continue improving the site, so that it best serves all of your Azure cloud cost monitoring needs.
The azure cost monitor team is pleased to announce the launch of the extended breakdown options in the Daily Spending Reports.
This feature has been built to reflect what our users told us they need – more granular options in the daily spending reports in order to identify the biggest cost drivers and oversee unplanned spikes. The new feature enables users to customize the structure of their spending breakdowns within their reports:
Besides the extended breakdown options we added additional information to the spending dashboard as well. From now on it’s easy to filter or group cloud costs by Cost Centers, Departments or Resource Groups within the azure cost monitor dashboard:
How to get started? The spending breakdown is part of your daily spending reports automatically. So no further actions are required to get a crisp overview about your daily spendings. The settings concerning the daily spending report can be adapted in the settings of the contract in the navigation bar.
Interested in the extended spending breakdown options? Try the new feature today by simply logging into your azure cost monitor. The feature is part of any plan, starting from the free Basic plan up to the Enterprise plan.
Big Data often has something todo with analysing a big amount of data. The nature of this data makes it possible to split it up into smaller parts and let them be processed from many distributed nodes. Inspired from the team of CrowdProcess we like the idea to use the computing power of a growing web browser grid to solve data analytic problems.
The Azure Cost Monitor does not have the requirement to solve big data problems of user A in the browser of user B, we would never do this because of data privacy but we have a lot of statistic jobs which need to be processed. From an architecture perspective the question comes up why not to use a growing amount of browser based compute nodes connected with our system instead? Starting with this idea we identified that WebWorkers in modern browsers are acting like small and primitive compute nodes in big data networks. The team from the SETI@Home project also gave us the hint that this option works very well to solve big data challenges.
A very simple picture was painted very fast on the board to illustrate our requirements. The user should not be disturbed from the pre-calculation of statistic data in his browser and the whole solution should prevent battery drain and unwanted fan activities:
It’s also important to understand that some smaller devices like a RaspberryPI which is used for internet browsing or an older smartphone is not able to process the job in time to generate a great user experience. Because of this, the picture changed a bit and we invented a principal we call “Preemptive Task Offloading”.
“Preemptive Task Offloading” lives from the idea that the server and the browser are using the same programming language and the same threading subsystem to manage tasks. Because of that the service itself can decide whether it moves tasks in the browser on the end user or pre-calculates them on the server to ensure great user experience.
The illustrated solution is able to improve the user experience for your end users dramatically and lowers the hosting costs for SaaS applications in the same time.
How it works
The first step is to find the lowest common denominator, in our case it’s called JavaScript. Javascript can be executed in all modern browsers and in the server via node.js. Besides this node and web browser has concepts, e.g. WebWorkers to handle multi threading and multi tasking. The second important ingredient is a framework which abstracts the technical handling of threads or tasks because they are working different in the backend or frontend. We identified parallel.js as a great solution for this because it gives us a common interface to the world of parallel tasks in frontend and backend technologies. Last but not least a system needs to identify the capabilities of the browser. For this we are using two main approaches. The first one tries to identify the capability to spin of web workers and identifies the amount of CPUs. For this we are using the CPU Core Estimator to also support older browsers. The second step of capability negotiation is a small fibonacci calculation to identify how fast the browser really is. If we come to a positive result our system starts the task offloading into the web browser, a negative result leads to a small call against our API to get the preprocessed information from our servers.
Conclusion
After testing this idea several weeks, I can say that this approach helps a lot to build high performance applications, with acceptable costs on the server side. Personally I don’t like the approach to give customer sensitive data into the browser of other customers to much, but I think this approach works great in scientific projects. What do you think about big data approaches in the browser? What are your pitfall or challenges in this area? Just leave a comment bellow or push a message on Twitter.
The Azure Cost Monitor Team is happy to announce the launch of the new filtering feature, starting today.
Now, users are able to create data filters to get instant access to important or costly services. Filtering enables users to only show results that match a specific criteria. For example a stakeholder may want to only report on a specific tag value or type of cloud service.
It is even possible for team administrators to share created filters with team mates and co-workers, so everyone may stay focused on their cost drivers in the Azure subscriptions.
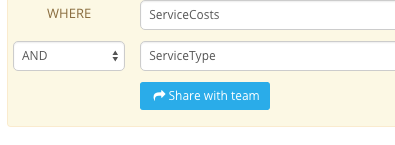
The system supports a top to bottom “and/or” logic what means that you can create the filters as you would naturally read a sentence. This allows you to combine different attributes in an “and” or “or” clause.
How to get started?
Adding a new filter to the Azure Cost Monitor is this simple:
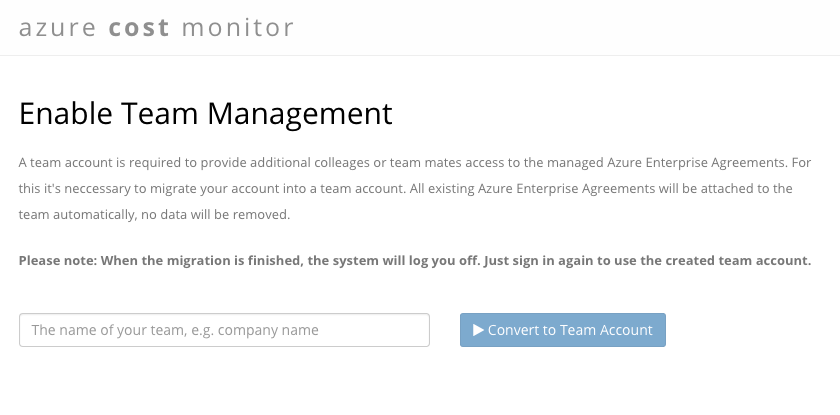
1) Log In to the Azure Cost Monitor Dashboard and if you don’t have a team account migrate to a team (optional):
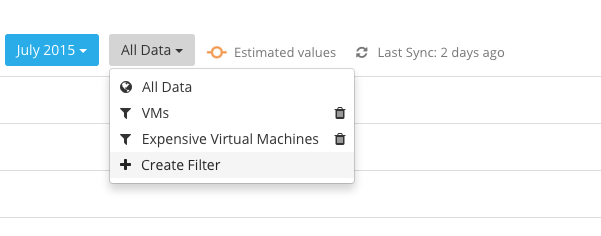
2) Select the “Create Filter” drop down at the spending reports page.
3) Add several conditions to the filter and save it:
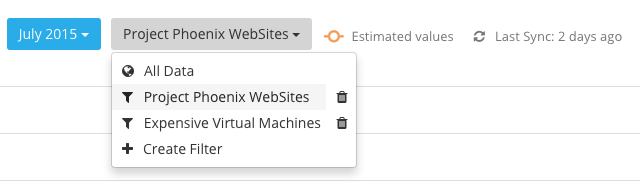
4) Just switch between different filters by selecting the needed one:
5) If you are the team administrator share a created filter with the team by clicking the “Share with team” button:
Interested in the filtering feature? Try the new feature today by simply logging into your Azure Cost Monitor. The feature is part of any plan, starting from the free Basic plan up to the Enterprise plan.
Getting a displayed number in the daily report isn’t always enough. For staying up to date on a daily basis concerning Azure spendings it’s way better to have a subscription breakdown available which helps to identify the biggest cost drivers or to oversee unplanned spikes.
So the Azure Cost Monitor Team is very pleased to announce the support for subscription breakdowns in the daily spending report, starting today.
How to get started?
The subscription breakdown is part of your daily spending reports automatically. So no further actions are required to get a great overview about your daily spendings. As usual, settings concerning the daily spending report can be adapted in the settings of the contract in the navigation bar.
Interested in the Subscription Breakdown feature: Try the new feature today by simply logging into your Azure Cost Monitor. The feature is part of any plan, starting from the free Basic plan up to the Enterprise plan.
The Azure Cost Monitor Team is very pleased to announce the launch of the Azure Active Directory support starting today.
Microsoft Azure Active Directory is an identity and access management cloud solution that provides a robust set of capabilities to manage users and groups. It also helps to secure access to cloud applications including Microsoft online services like Office 365.
With the new feature, the Azure Cost Monitor allows to link teams against an existing Azure Active Directory. By doing so, a centralized identity and access management can be realized easily.
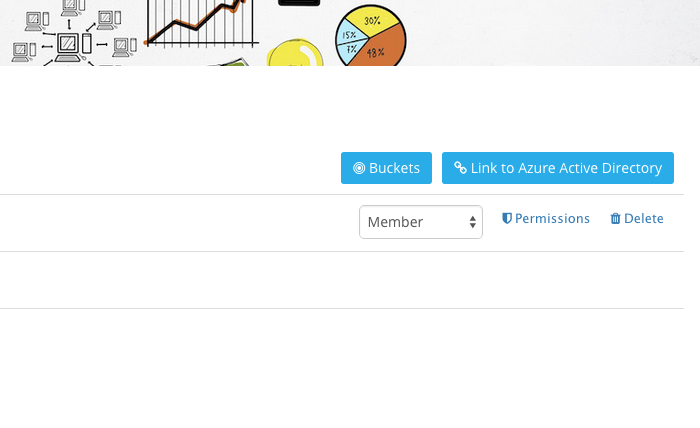
The support of Azure Active Directory Groups, enables you to grant access to dedicated groups of people or departments within your enterprise. This ensures an easy integration into your existing IT service infrastructures .
Last but not least, a seamless sign-in experience for all users (single-sign-on) can be generated by combining the Azure Directory setup with the customer buckets feature.
How to get started?
Linking an existing Azure Active Directory to the Azure Cost Monitor is that simple:
Log in to the Azure Cost Monitor Dashboard and if you don’t have a team account migrate to a team:
Select the “Link to Azure Active Directory” button to start the setup process
Follow the description and login for the first time with a global administrator of your Azure Active Directory to give the required consent that allows users of your Azure Active Directory to sign in to the Azure Cost Monitor.
After the successful consent save the directory settings. All users of the Azure Active Directory can use the Azure Cost Monitor now.
Configure a new bucket so that all users will be redirected to the Active Directory Sign-In process automatically. This step is optional and can be done later as well.
Interested in the Azure Active Directory feature: The new feature integrates the Azure Cost Monitor more seamless into existing IT service infrastructures and increases the end user experience of your team members and co-workers. Especially the group based permission support allows you to delegate the access management to a centralised IT organisation.
Try the new feature today by simply logging into your Azure Cost Monitor enterprise account. If you don’t have an enterprise subscription, try it for free for a certain time, as we are currently in the technical preview phase.
The Azure Cost Monitor Team is happy to announce the launch of the new customer url feature starting today.
Now, users are able to create as many customer urls for their team as required. These customer urls are called buckets in the Azure Cost Monitor because the system can connect different information and actions with an bucket. Whenever a user visits the Azure Cost Monitor with the generated bucket url the system triggers the preferred sign-in workflow, e.g. Azure Active Directory. In addition the system applies the configured branding, so that every end user gets the same unique experience.
How to get started?
Adding a new bucket to the Azure Cost Monitor is that simple:
Log In to the Azure Cost Monitor Dashboard and if you don’t have a team account migrate to a team:
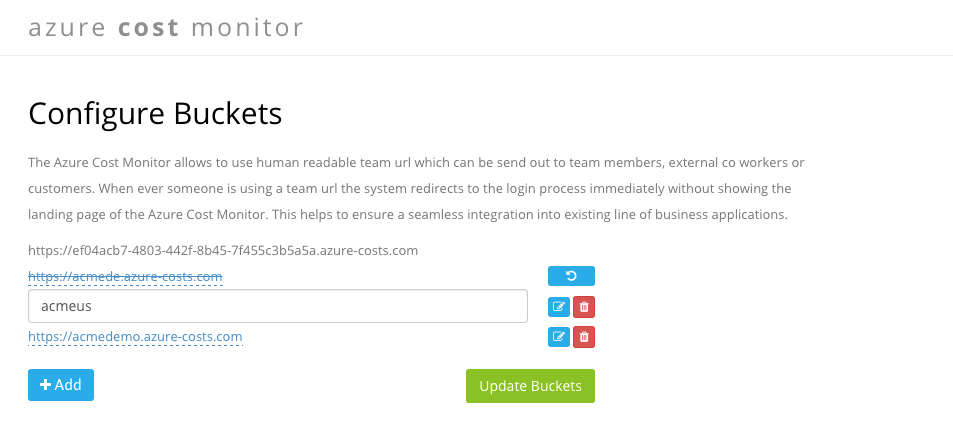
Select the “Buckets” button to open the bucket management view:
Add or remove buckets in this overview
Tip: Every team has a default bucket which is the same as the team id and can be used directly when no custom bucket is created.
Interested in the “customer url – feature”?
The new feature integrates the Azure Cost Monitor more seamless into existing IT service infrastructures and increases the end user experience of your team members and co-workers.
Try the new feature today by simply logging into your Azure Cost Monitor enterprise account. If you don’t have an enterprise subscription, try it for free for a certain time, as we are currently in the technical preview phase.
Microsoft Azure Active Directory is a steady growing identity- and access-management platform which can be used from developers to swap out user management, authentication and authorisation. Azure Active Directory offers several end points and authentication protocols e.g. SAML2, WS-FED or oAuth2. A widely adopted protocol is oAuth2 which ends up with an issued JWT token. This article describes how the JWT token issued by Azure Active Directory can be verified in a node.js application.
Anatomy of a JWT
A JWT token is a non-encrypted digitally signed JSON payload which contains different attributes (claims) to identify the user.
The header is very static and should be used to identify which algorithm was used for the digital signing. This signing algorithm needs to be used to verify the digital signature in the node.js application later on. The payload contains the JSON object with all the claims and information which can be used to verify the user. Trusting this content is only possible when the digital signature of the token is valid and some standard claims, e.g. the issuer or the audience are verified. Otherwise it could be that someone else generated a JWT (man in the middle attack) to get unauthorised access to your application. The signature is the last part of the JWT and needs to be used for verification of the payload. This signature was generated with the algorithm described in the header to prevent unauthorised access.
How AAD issues a token
Azure Active Directory offers every developer the possibility to create applications. If this application is a multi tenant application, other active directory administrators are able to install this application into their directory. At the end of the day an Azure Active Directory application can live in many tenants. Every tenant in the AAD ecosystem has an own set of keys and certificates which are used to sign cryptographic messages. This means that when a directory with the Id “DIRAAA” issues a token for an application the issuer would be
So the node.js application needs to verify if the token was issued from the directory we expect. Another side effect of this is, that Azure Active Directory uses different keys for every tenant to issue tokens. This means that the validation code needs to get the right verification key for the token. Microsoft uses RS256 for JWTs issued via oAuth2, so the right certificate needs to be downloaded from somewhere.
Download the right certificates
Microsoft publishes the certificates (public portion of the signing keys) as part of the well known OpenId configuration. It can be downloaded here:
The result is a JSON payload which contains the jwks_uri that should be used to download the certificates. Behind the URI several certificates are available and we currently don’t know which the right one is. The simplest way would be to do a little brute force and verify the JWT against every certificate.
Verification Strategy
Inventing code which is able to verify any AAD issued JWT, without knowing if the application is a multi-tenant or single tenant application is the goal. The following process describes a possible algorithm which can be implemented with existing JWT libraries very easily:
Decode the token to extract the tenant-id because the tenant-id is part of the payload, stored as tid-claim. (!!! Currently we don’t know if we can trust this information !!!)
Download the signing certificates from the well known openid configuration endpoint Microsoft provides. The end point url can be generated with the help of the tenant-id.
Verify the JWT with RS256 against the downloaded certificates. For this, every existing JWT module can be used.
After the token is validated check if the iss-claim contains the same value we expect from the tenantid.
After this process the system verifies the token and we know that this token was issued by Azure Active Directory for the described tenant. This means we are now able to rely on this information.
Node.js integration
All described steps are implemented in a small node package which allows to verify a given token as long as the node application has internet access and can download the certificates. The component can be installed via:
npm install azure-ad-jwt –save
A basic example to verify a given token could look like this:
This file contains hidden or bidirectional Unicode text that may be interpreted or compiled differently than what appears below. To review, open the file in an editor that reveals hidden Unicode characters. Learn more about bidirectional Unicode characters
The component is currently not intended to be an express middleware but it’s easy to extend it that way. A good starting point is the express-jwt middleware which should be used as starting point. The current implementation does not work with certificate caching, so when your system has a huge amount of verification requests it makes no sense to download the certificates during every request. This can be done once when the application starts or in a small cache implementation which invalidates the certificate when it was expired as well.
I hope this helps everybody in the node.js space to integrate Azure Active Directory very fast and easily. The described component is used from the Azure Cost Monitor in the production environment so feel free to integrate the package also in your real world applications.
So when you have any questions, feel free and leave a message on this blog.
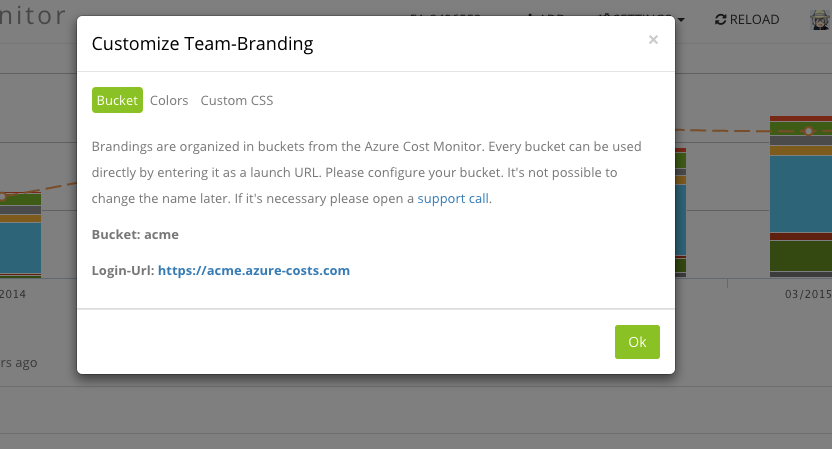
The Azure Cost Monitor Team is happy to announce the launch of the new branding feature, starting today.
Now, Azure Cost Monitor users can customize their application with the title, color schemes and images of their choosing, for a more seamless integration into already existing IT processes of an enterprise. This new feature also enables Cloud Service Providers and Resellers to offer the Azure Cost Monitor as a White-Label-Solution.
How to get started?
Adding a customized branding to the Azure Cost Monitor is this simple:
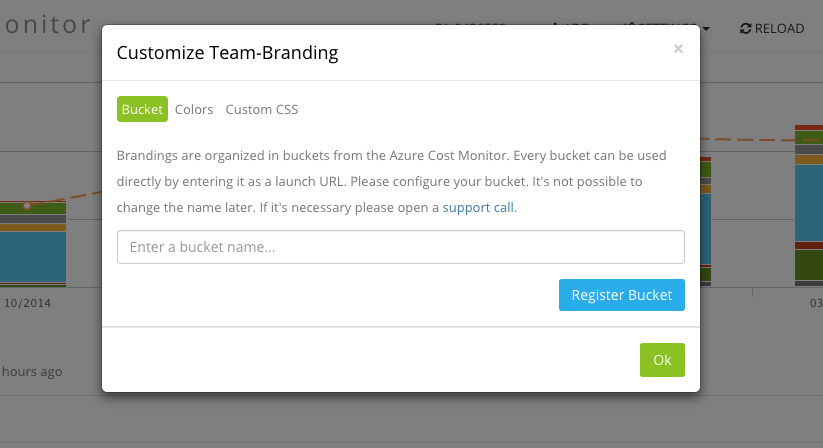
Define a bucket name to give your customizing a unique launch URL.
Define your customized header title, color schemes, button colours or even add a custom CSS for advanced styles. Changes will be shown in the dashboard immediately.
Once you have configured the custom branding, the users will see the branded pages after they have entered their bucket URL, which can simply be deployed e.g. as browser favourite.
Interested in the branding feature? The new branding feature leads to an higher acceptance and identification within an enterprise and makes azure cloud cost management seamless and comfortable.
Try the new branding feature today by simply logging into your azure cost monitor enterprise account. If you don’t have an enterprise subscription, try it for free for a certain time, as we are currently in the technical preview phase.