The Azure Cost Monitor Team is happy to announce the launch of the new customer url feature starting today.
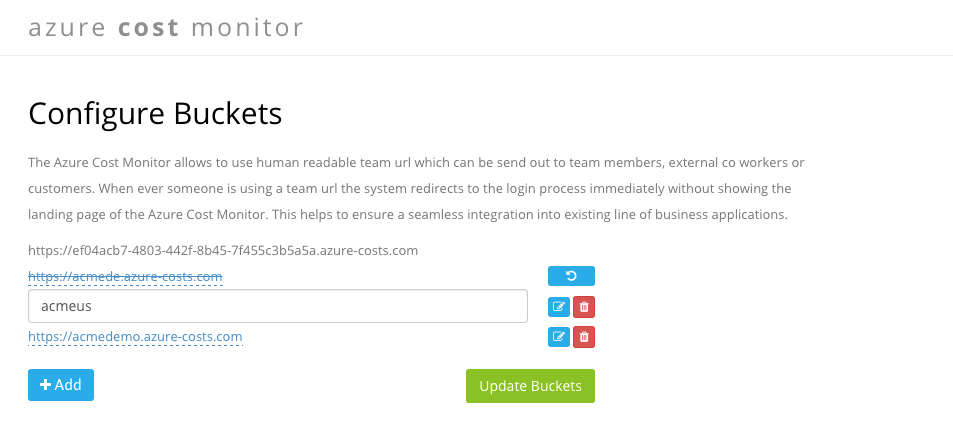
Now, users are able to create as many customer urls for their team as required. These customer urls are called buckets in the Azure Cost Monitor because the system can connect different information and actions with an bucket. Whenever a user visits the Azure Cost Monitor with the generated bucket url the system triggers the preferred sign-in workflow, e.g. Azure Active Directory. In addition the system applies the configured branding, so that every end user gets the same unique experience.
How to get started?
Adding a new bucket to the Azure Cost Monitor is that simple:
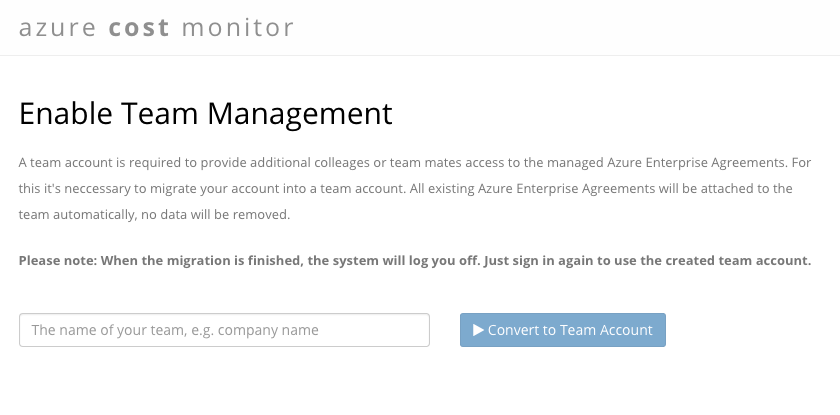
Log In to the Azure Cost Monitor Dashboard and if you don’t have a team account migrate to a team:
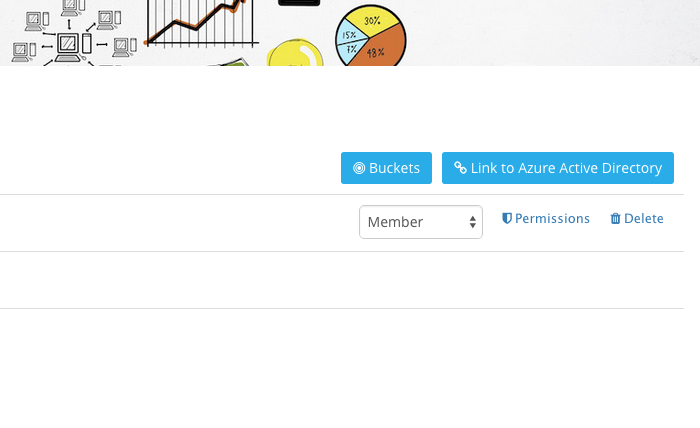
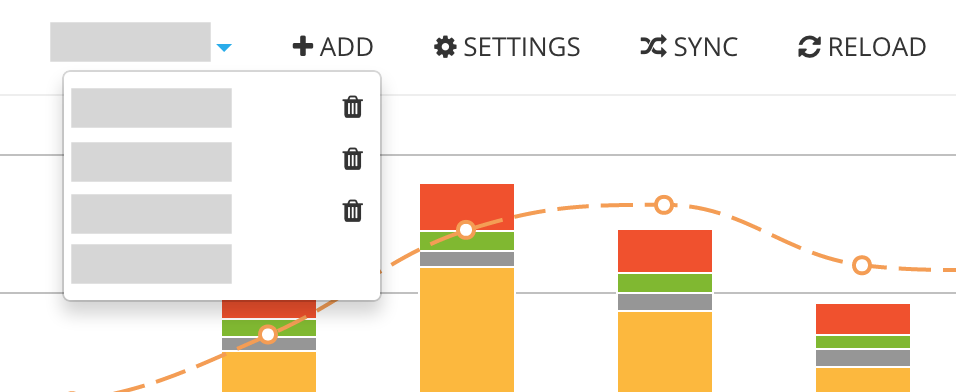
Select the “Buckets” button to open the bucket management view:
Add or remove buckets in this overview
Tip: Every team has a default bucket which is the same as the team id and can be used directly when no custom bucket is created.
Interested in the “customer url – feature”?
The new feature integrates the Azure Cost Monitor more seamless into existing IT service infrastructures and increases the end user experience of your team members and co-workers.
Try the new feature today by simply logging into your Azure Cost Monitor enterprise account. If you don’t have an enterprise subscription, try it for free for a certain time, as we are currently in the technical preview phase.
Microsoft Azure Active Directory is a steady growing identity- and access-management platform which can be used from developers to swap out user management, authentication and authorisation. Azure Active Directory offers several end points and authentication protocols e.g. SAML2, WS-FED or oAuth2. A widely adopted protocol is oAuth2 which ends up with an issued JWT token. This article describes how the JWT token issued by Azure Active Directory can be verified in a node.js application.
Anatomy of a JWT
A JWT token is a non-encrypted digitally signed JSON payload which contains different attributes (claims) to identify the user.
The header is very static and should be used to identify which algorithm was used for the digital signing. This signing algorithm needs to be used to verify the digital signature in the node.js application later on. The payload contains the JSON object with all the claims and information which can be used to verify the user. Trusting this content is only possible when the digital signature of the token is valid and some standard claims, e.g. the issuer or the audience are verified. Otherwise it could be that someone else generated a JWT (man in the middle attack) to get unauthorised access to your application. The signature is the last part of the JWT and needs to be used for verification of the payload. This signature was generated with the algorithm described in the header to prevent unauthorised access.
How AAD issues a token
Azure Active Directory offers every developer the possibility to create applications. If this application is a multi tenant application, other active directory administrators are able to install this application into their directory. At the end of the day an Azure Active Directory application can live in many tenants. Every tenant in the AAD ecosystem has an own set of keys and certificates which are used to sign cryptographic messages. This means that when a directory with the Id “DIRAAA” issues a token for an application the issuer would be
So the node.js application needs to verify if the token was issued from the directory we expect. Another side effect of this is, that Azure Active Directory uses different keys for every tenant to issue tokens. This means that the validation code needs to get the right verification key for the token. Microsoft uses RS256 for JWTs issued via oAuth2, so the right certificate needs to be downloaded from somewhere.
Download the right certificates
Microsoft publishes the certificates (public portion of the signing keys) as part of the well known OpenId configuration. It can be downloaded here:
The result is a JSON payload which contains the jwks_uri that should be used to download the certificates. Behind the URI several certificates are available and we currently don’t know which the right one is. The simplest way would be to do a little brute force and verify the JWT against every certificate.
Verification Strategy
Inventing code which is able to verify any AAD issued JWT, without knowing if the application is a multi-tenant or single tenant application is the goal. The following process describes a possible algorithm which can be implemented with existing JWT libraries very easily:
Decode the token to extract the tenant-id because the tenant-id is part of the payload, stored as tid-claim. (!!! Currently we don’t know if we can trust this information !!!)
Download the signing certificates from the well known openid configuration endpoint Microsoft provides. The end point url can be generated with the help of the tenant-id.
Verify the JWT with RS256 against the downloaded certificates. For this, every existing JWT module can be used.
After the token is validated check if the iss-claim contains the same value we expect from the tenantid.
After this process the system verifies the token and we know that this token was issued by Azure Active Directory for the described tenant. This means we are now able to rely on this information.
Node.js integration
All described steps are implemented in a small node package which allows to verify a given token as long as the node application has internet access and can download the certificates. The component can be installed via:
npm install azure-ad-jwt –save
A basic example to verify a given token could look like this:
This file contains hidden or bidirectional Unicode text that may be interpreted or compiled differently than what appears below. To review, open the file in an editor that reveals hidden Unicode characters. Learn more about bidirectional Unicode characters
The component is currently not intended to be an express middleware but it’s easy to extend it that way. A good starting point is the express-jwt middleware which should be used as starting point. The current implementation does not work with certificate caching, so when your system has a huge amount of verification requests it makes no sense to download the certificates during every request. This can be done once when the application starts or in a small cache implementation which invalidates the certificate when it was expired as well.
I hope this helps everybody in the node.js space to integrate Azure Active Directory very fast and easily. The described component is used from the Azure Cost Monitor in the production environment so feel free to integrate the package also in your real world applications.
So when you have any questions, feel free and leave a message on this blog.
The Azure Cost Monitor Team is happy to announce the launch of the new branding feature, starting today.
Now, Azure Cost Monitor users can customize their application with the title, color schemes and images of their choosing, for a more seamless integration into already existing IT processes of an enterprise. This new feature also enables Cloud Service Providers and Resellers to offer the Azure Cost Monitor as a White-Label-Solution.
How to get started?
Adding a customized branding to the Azure Cost Monitor is this simple:
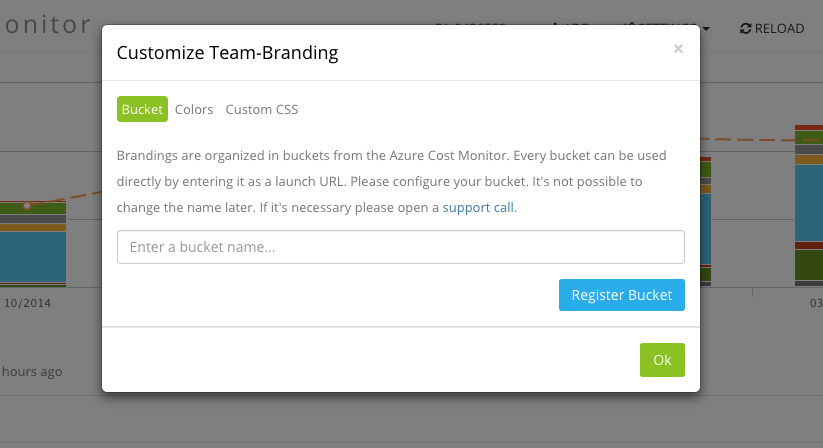
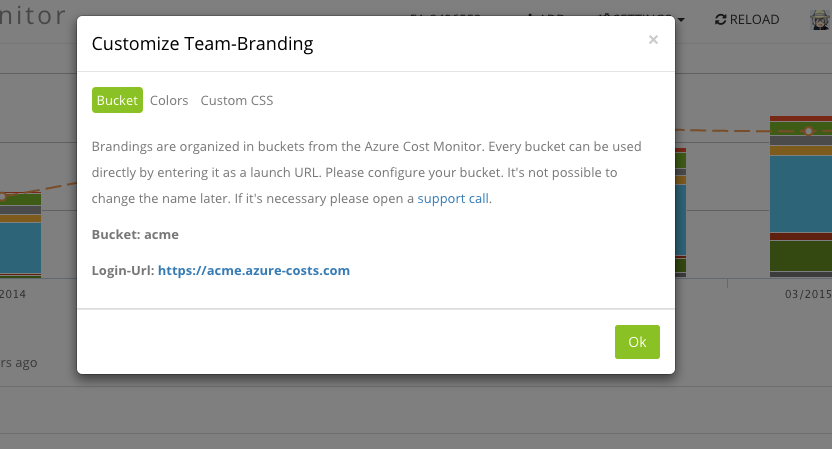
Define a bucket name to give your customizing a unique launch URL.
Define your customized header title, color schemes, button colours or even add a custom CSS for advanced styles. Changes will be shown in the dashboard immediately.
Once you have configured the custom branding, the users will see the branded pages after they have entered their bucket URL, which can simply be deployed e.g. as browser favourite.
Interested in the branding feature? The new branding feature leads to an higher acceptance and identification within an enterprise and makes azure cloud cost management seamless and comfortable.
Try the new branding feature today by simply logging into your azure cost monitor enterprise account. If you don’t have an enterprise subscription, try it for free for a certain time, as we are currently in the technical preview phase.
The Azure Cost Monitor Team is excited to announce the launch of the new “subscription based permissions – feature”, starting today.
When it comes to ensuring effective cloud use at your company, nothing will help you make better decisions than the right, relevant data. With this new feature, adressing specific ressources to each department has never been easier.
This great feature also makes it very easy for Service Providers to give their customers transparency about their subscription based spendings.
Interested in the “subscription based permission – feature”?
The new feature brings structure to all of your subscriptions in the Azure Cost Monitor and makes cloud cost management easy and comfortable.
Try the new feature today by simply logging into your Azure Cost Monitor enterprise account. If you don’t have an enterprise subscription, try it for free for a certain time, as we are currently in the technical preview phase.
With Azure App Services (aka. Azure WebSites), the Microsoft Azure cloud offers a great, highly scalable and simple way to host cloud and SaaS services. Besides ASP.NET, several other platforms and languages are supported, e.g. node.js, Python or Java. I personally prefer hosting services written in node.js on this nice managed service of Microsoft.
A common problem for web-services are background jobs like e.g. sending out e-mails or calculating some sales numbers once a day. This use-case can be addressed with Azure WebJobs which are running on the same instance as the web service itself. Jamie Espinosa described the behaviour of WebJobs on an Azure Friday very well. Azure Friday is BTW hosting a whole series about Azure WebJobs, so check it out to get more information.
Normally when deploying a web service into the Azure WebSite the associated WebJobs will be restarted out of the box. A special thing of node.js based Azure WebJobs is that only when the run.js file is changed the WebJob will be restarted. This means when the system just changes an other module or updates the npm dependencies no restart will be enforced.
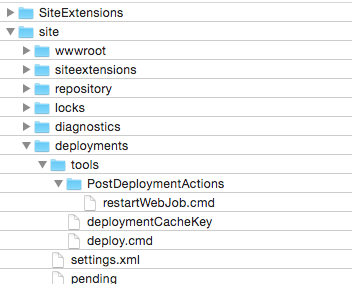
The whole deployment is based on the Kudu-Project and this project offers so called Post-Deployment-Action-Hooks to trigger a simple script right after the successful deployment of the sources. When ever the run.js file becomes touched the system just restarts the web service, so the solution for this deployment issue was to write a short batch which touches all run.js files:
@echo off

echo Restarting all WebJobs
for /R ..\wwwroot\App_Data\jobs %%G IN (*run.js) DO echo Touching %%G
for /R ..\wwwroot\App_Data\jobs %%G IN (*run.js) DO touch %%G

exit 0
This script can be registered as Post-Deployment-Action-Hook via FTP at every Azure WebSite. Just copy the file to the following location:
This works fine but after all there is still one piece missing: How to get the deployment hooks deployed with git themselves? There are several options to reconfigure the deployment hook directory but I was not able to figure this out. So when you have an idea, feel free and leave a message to discuss any options.
The azure cost monitor team is very happy to announce the launch of the team-support feature, starting today. This great feature allows enterprise accounts to be accessed by as many users as needed, simplifying the sharing of spending dashboards and cost data within an enterprise.
Team-Support enables companies to use the azure cost monitor without concerning about departmental boundaries and makes processes like cross-charging possible & easy.
What comes with the new team-support feature?
Limitless amount of users: Create an unlimited number of users for your azure cost monitor enterprise account.
Role based access: Define the role of new users and specify whether each user can add new users, renew EA tokens, add new EA contracts and other important actions.
Mail based invitations: Enter the email addresses of the users you would like to invite to your account. The addressed user gets an invitation and can join your team fast and simple.
How to get started?
Adding new users to your azure cost monitor team account is this simple:
If you already have an existing account migrate your account into a team account.
This migration only needs to be done once. During this process the system converts your personal account in a team account and assigns all existing enterprise agreements to the team.
Click “Add User to the Team”
Fill in the new user’s email address and choose the users role. After that click “Add” and “Save” the changes.
The new user will get a mail with instructions for activating the login.
Interested in the team support feature?
The new team support feature brings transparency to all stakeholders within an enterprise and makes azure cloud cost management easy and comfortable.
Try the new team support feature today by simply logging into your azure cost monitor enterprise account. If you don’t have an enterprise subscription, try it for free for a certain time, as we are currently in the technical preview phase.
The last part of this article series described the principles of Twitter-like services based on Azure Storage Tables. This part now describes the structure of a new node module which acts as a timeline service. This service can be used very easily in existing node projects.
To integrate this node module just install the azure-timeline-service via node package manager. This integrates everything that is required automatically:
npm install azure-timeline –save
The module allows to post events to a specific user timeline and the timeline of all followers. The following snip-let illustrates it:
var user = azureTimelineService.createSubject(“<>”, “<>”);
user.postEvent(‘login’, { timestamp: new Date() }).then(function() {
console.log(“DONE”);
});
Every method works asynchronous based on promises. Following another user is as simple as posting an event to a timeline
Following a user means all events this user posts to a timeline will be posted to the followers timeline as well. Last but not least loading a timeline is important. The system returns currently all events from a timeline which is a point of change in the future:
All samples are implemented in the sample file of the Azure Timeline project here. Any questions? Feel free to open an issue at GitHub or just stay in touch via this block.
Are you an Azure reseller or a cloud service provider offering Microsoft Azure services? If so, we start offering you a smarter way to have control about the cloud spendings of your customers or to give your customers a great monitoring tool, seamlessly integrated in your service architecture. The Azure Cost Monitor Reseller Portal is a new way for service providers and resellers to monitor, manage & measure costs in the Microsoft Azure cloud:
Besides the Enterprise Edition features, the portal will come with these additional features:
Customer Management Dashboard
Manage access to the Azure account or a specific subscription for your customers. Invite new users or assign an existing Azure Active Directory group to provide access rights.
Custom SSL & Domain support
Integrate the service seamlessly in your or the customers service architecture, with a service provider or customer specific domain incl. SSL certificates.
Custom pricing & currency support
Especially when you resell just a simple subscription or if you add some reseller service charges to the pricing, a custom pricing table helps you to manage this complexity.
Data access via RESTful API
A strong integration, e.g. into an existing data warehouse or CRM application is easy and simple with the existing RESTful API.
Allows to resell enterprise editions
Having a reseller edition allows every reseller and cloud service provider to resell Azure Cost Monitor enterprise editions with an individual margin.
Interested? Signup for the early adaptor program and get direct access to the current system.
We hope this feature makes it simple to maintain your customers with the Azure Cost Monitor and makes it much easier for you to manage and control all costs. Any questions, wishes or ideas? Try our feedback portal or drop a mail to help@azure-costs.com.
The $toolbar service is a great helper when it comes to building toolbars in AngularJS applications. The new version 0.0.3 allows you to handle new secondary actions, as shown here in the Azure Cost Monitor application:
The secondary action can be defined in the addItem function similar to all other options the API supports:
Making the menu more user-friendly can be achieved by adding dividers in the structure. When using the special menu title “DIVIDER” the system will use this in the menu structure as divider:
The new navigation infrastructure of the Azure Cost Monitor is using the $toolbar service from the ngHelper-Toolbar project. We hope this feature makes it simple to maintain your toolbars. Any questions, wishes or ideas? Try the issue button on the GitHub page or contact the author via this blog.
Azure Table Store offers a very important scalability feature which should be used when working with timelines. The partitionkey in every table allows Microsoft to put entities on different servers. Let’s recheck the limits of Azure Table Store to make a right decision (http://azure.microsoft.com/en-us/documentation/articles/azure-subscription-service-limits):
Azure Table Store returns 1000 entities per page. If the result contains more entities the client needs to query several times -> A timeline service should never page to render the first timeline
Azure Table Store returns 2000 entities with 1KB of size per second as a guaranteed SLA –> A timeline service should never request more data per page to stay performant
Azure Table Store allows to store up to 500TB per storage account, it could be stored in one table or different –> A timeline service should be able to handle several storage accounts, at least theoretically.
With all this limitations in mind it’s possible to build a table structure for the timeline service as follows:
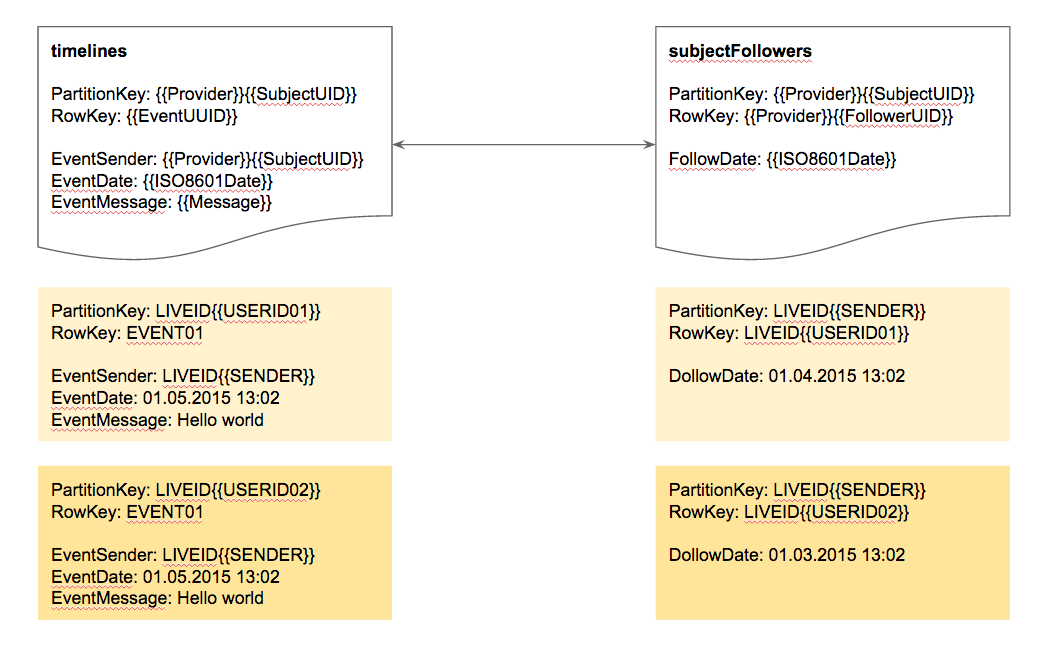
timelines
The timlines table contains all timelines the system has registered. The partitionkey of this table is timeline identifier so every subjects timeline can be stored on different nodes. The partitionkey should be a key generated from the subjects identification, e.g. liveid{{UID of LiveId-Token}}. This prevents the system to lookup an other table to get the timeline identifier when the subject tries to render them.In addition the event which should be stored on several timelines can be identified by his event identifier as the row key. This allows the system to also implement removal jobs because a multiple stored event can be identified as the single one.
subjectFollowers
the subjectFollowers are a list of subjects following a specific subject. The partitionkey of this table is also the subject identifier so it’s easy to get all followers of a subject. In addition the row key becomes important because it identifies the subject who is following someone else. This gives a system the option to find all followers of a specific subject and all subjects a specific subject is following very fast. Works well in both directions.
This simple data structure allows the service to handle hundreds of different timelines and relations. Especially the background worker can now identify on which timeline the event needs to be stored.
Last but not least, when it comes to requesting the timeline content it will only be returned in pages of 250 elements to stay healthy with the performance. An other page can be requested at any time when the user starts paging.